Difference between revisions of "Future Imperfect - Action Cards"
(→Combat Example, Chuk vs Klackons, continued) |
(→Combat Actions) |
||
| (96 intermediate revisions by the same user not shown) | |||
| Line 3: | Line 3: | ||
This chapter is intended to provide an overview of how to use the action cards. It is not intended as a full rules explanation. Some elements of the rules need to be explained to provide the necessary context for understanding card usage, but it is in no way complete. Please reference the appropriate rulebook chapters for comprehensive rules explanations. | This chapter is intended to provide an overview of how to use the action cards. It is not intended as a full rules explanation. Some elements of the rules need to be explained to provide the necessary context for understanding card usage, but it is in no way complete. Please reference the appropriate rulebook chapters for comprehensive rules explanations. | ||
| − | = | + | =Reading Cards= |
The Action Cards included with Future Imperfect are loaded with data. The sheer volume of information may seem daunting at first, yet once their usage is mastered they become simple and quick to utilize. Note that even in the most detailed of actions only a subset of the information contained will be referenced. In most cases only one or two sections will be necessary. | The Action Cards included with Future Imperfect are loaded with data. The sheer volume of information may seem daunting at first, yet once their usage is mastered they become simple and quick to utilize. Note that even in the most detailed of actions only a subset of the information contained will be referenced. In most cases only one or two sections will be necessary. | ||
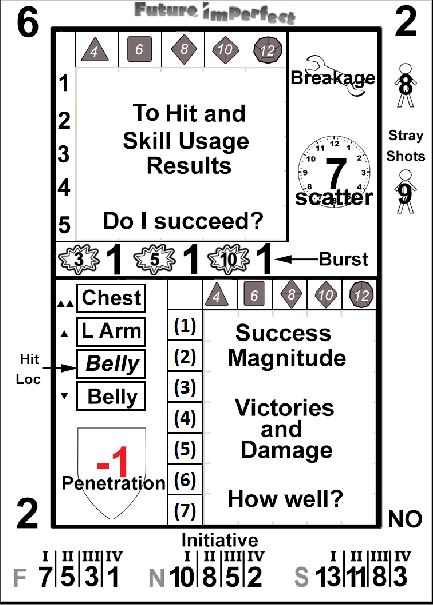
| − | + | The card is divided into sections. A streamlined overview of what is where is below. | |
| − | [[image: | + | [[image:simplified.JPG]] |
| − | + | The image above is labeled according to the most common usages of the card. The concept is to distill the sections into single entities. There may be 25 numbers in a bank in the upper grid (discussed below), but functionally, it is just a single thing. | |
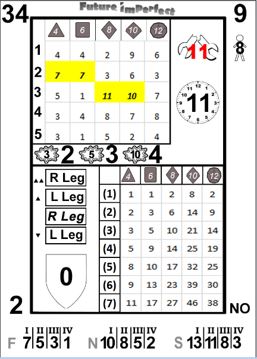
| − | The example card | + | To learn how to read a card, begin by drawing one and examining the card face. |
| + | |||
| + | [[image:Example.JPG]] | ||
| + | |||
| + | Consider the entry in the upper left corner of the card, only. Do not let the information density overwhelm you at first glance. The cards have enough information to resolve any kind of action, in any situation. But in any given action, only a small subset of the entries will be consulted. To avoid information overload, concentrate only on the entries needed for the action you are currently resolving. This step by step guide will show you how to use each section in turn, and provide concrete examples to bring the knowledge together into a useful form. | ||
| + | |||
| + | [[Action Card Concepts|Action card concept]] 1: Use what you need, ''ignore everything else''. | ||
| + | |||
| + | The example card is number 34. When cards are referenced, the large number in the upper left is the unique identifying number. Anytime the rulebook refers to a card, it will reference this number. These numbers range from 0-53, as discussed [[Future_Imperfect:_Appendix_-_1,_Action_Cards#The_Four_Corners|here]]. | ||
| + | |||
| + | Each card is divided into three sections, | ||
| + | |||
| + | [[image:outeredge5-3.JPG]] | ||
| + | |||
| + | the '''outer edge''', containing the following information: | ||
| + | |||
| + | 1. Initiative bar (discussed [[Future Imperfect - Initiative and Action Speeds|here]])<br> | ||
| + | 2. Unintended targets (ancillary effects, [[Future_Imperfect_-_Action_Cards#Ancillary_Effects|below]])<br> | ||
| + | 3. Corner results ([[Future_Imperfect:_Appendix_-_1,_Action_Cards#The_Four_Corners|appendix]]).<br> | ||
| + | |||
| + | [[image:upperresults5-3.JPG]] | ||
| + | |||
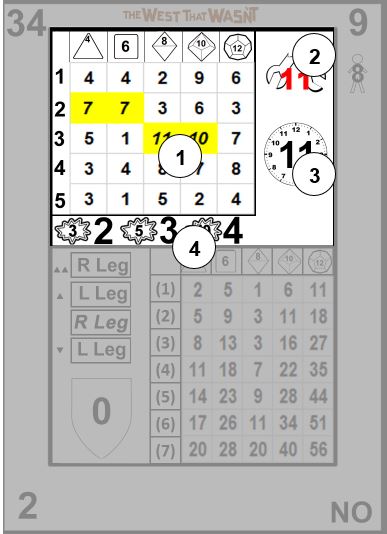
| + | The '''upper results''', containing: | ||
| + | |||
| + | 1. Cause grid (next section, [[Future_Imperfect_-_Action_Cards#Performing_Skill_Checks|skill checks]])<br> | ||
| + | 2. Equipment Failure (ancillary effects, [[Future_Imperfect_-_Action_Cards#Ancillary_Effects|below]])<br> | ||
| + | 3. Scatter (ancillary effects, [[Future_Imperfect_-_Action_Cards#Ancillary_Effects|below]])<br> | ||
| + | 4. Burst results (combat, [[Future_Imperfect_-_Action_Cards#Burst_Fire|below]])<br> | ||
| + | |||
| + | [[image:lowerresults5-3.JPG]] | ||
| + | |||
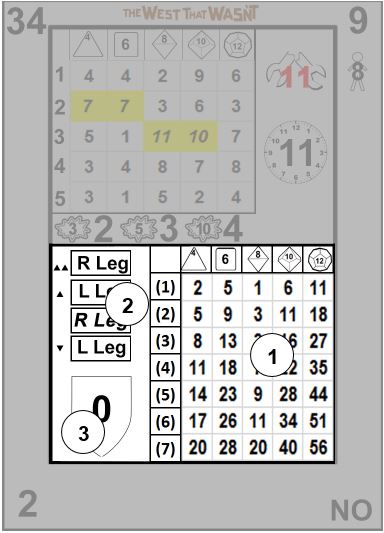
| + | And the '''lower results''', consisting of: | ||
| + | |||
| + | 1. Effect grid (complex skill checks, [[Future_Imperfect_-_Action_Cards#Complex_Skill_Checks:_More_Than_a_Binary_Result|below]])<br> | ||
| + | 2. Hit locations (combat, [[Future_Imperfect_-_Action_Cards#Hit_Location|below]]).<br> | ||
| + | 3. Armor penetration (combat, [[Future_Imperfect_-_Action_Cards#Armor_Penetration.2FAblation|below]]). | ||
| + | |||
| + | ==Nomenclature== | ||
| + | When speaking of a single given cell in the cause grid, the convention is row-column, such as 3-8, for the d8 cell that has an 3 result (third row, above). When speaking of a result set, where multiple dice of a given type are rolled, the standard RPG convention of [row]d[column] is used, so for 3d8, the results of 7, 7 and 3 would be included (again, using the above image). In the effect grid the convention is the same, except the row labels are enclosed in parentheses, so the 4th entry in the d8 column is (4)-8. | ||
| + | |||
| + | Now that you are oriented and informed on card notation, the first step is learning the simplest task, a basic skill check. | ||
| + | |||
| + | =Performing Skill and Attribute Checks= | ||
| + | Roleplaying games are predicated on characters doing interesting things. Many times, those things may fail. When success is not guaranteed, action cards are used to determine the outcome. The process is detailed below. | ||
==The Cause Grid: Simple Skill Checks== | ==The Cause Grid: Simple Skill Checks== | ||
| Line 19: | Line 62: | ||
Do not worry, dice <i>never</i> need to be rolled in conjunction with action cards. | Do not worry, dice <i>never</i> need to be rolled in conjunction with action cards. | ||
| − | Then why are the dice symbols present? As a player of roleplaying games, you are likely familiar with polyhedral dice. If this is your first roleplaying game, you may have seen the 6 sided cube that is used in table games such as craps to board and roleplaying games like Monopoly and Dungeons & Dragons as well. The dice symbols help to set expectations for players on what results are likely to occur in a given column. The 6 column, for example, acts like the standard six sided cube. Most results in the 6 column will fall within the range of 1-6, while the results in the 10 column will fall mostly from 1-10. A full explanation for how the results are distributed is available in the appendix | + | Then why are the dice symbols present? As a player of roleplaying games, you are likely familiar with polyhedral dice. If this is your first roleplaying game, you may have seen the 6 sided cube that is used in table games such as craps to board and roleplaying games like Monopoly and Dungeons & Dragons as well. The dice symbols help to set expectations for players on what results are likely to occur in a given column<nowiki>*</nowiki>. The 6 column, for example, acts like the standard six sided cube. Most results in the 6 column will fall within the range of 1-6, while the results in the 10 column will fall mostly from 1-10. A full explanation for how the results are distributed is available in the [[Future_Imperfect:_Appendix_-_1,_Action_Cards#Cell_Values|appendix]]. |
| − | Each row is an additional die of the appropriate type. When a skill level is greater than one, the player resolving the action may choose any result from a row equal to or less than the level of the skill, in the appropriate column based on the governing trait. The only exception to this is critical failures, discussed in the special section below. For example, if Sid Scorpio has an Essence of d6, and a Bravery of 3, he may choose either | + | Simple skill checks use ''only'' the cause grid. This means, according to Concept 1, everything else on the card should be ignored. All you need is a number of rows equal to the skill level of the skill being used and a column representing the die type of the appropriate trait (illustrated below). |
| + | |||
| + | Each row is an additional die of the appropriate type. When a skill level is greater than one, the player resolving the action may choose any result from a row equal to or less than the level of the skill, in the appropriate column based on the governing trait. The only exception to this is critical failures, discussed in the special section below. For example, if Sid Scorpio has an Essence of d6, and a Bravery of 3, he may choose either 4, 7 (why is this result highlighted? See exceptional results, [[Future_Imperfect_-_Action_Cards#Exceptional_Results|below]]) or 1 (assuming card 34, above, as the card drawn). | ||
[[image:3d6-2.JPG]] | [[image:3d6-2.JPG]] | ||
| Line 27: | Line 72: | ||
Skill checks are that simple. Draw a card, cross-reference the die type of the appropriate trait with the skill level of the skill being used, and choose the result. In general, the highest result present will be chosen, though there may be reasons why another result is selected. Except in the case of critical failures the active player (the one that drew the card and is resolving the check) may always choose whichever result he wishes. | Skill checks are that simple. Draw a card, cross-reference the die type of the appropriate trait with the skill level of the skill being used, and choose the result. In general, the highest result present will be chosen, though there may be reasons why another result is selected. Except in the case of critical failures the active player (the one that drew the card and is resolving the check) may always choose whichever result he wishes. | ||
| − | + | Attribute checks are performed exactly like skill checks, except the attribute level is used in place of skill level. | |
| + | After completing the check, place the card in the discard pile. Even though only a small amount of the information on the card was used, each card is utilized for a single action only. In the case of a simple skill check, between 1-5 rows in a single column will be consulted, nothing more. | ||
| + | |||
| + | <nowiki>*</nowiki>You may notice a 7 in cell 2-6, and an 11 in 3-8. The results are open ended, discussed in exceptional results, below (immediately after the following examples). For more on how the results are generated and distributed, see the [[Future_Imperfect:_Appendix_-_1,_Action_Cards#Cell_Values|appendix]]. | ||
===Further Examples=== | ===Further Examples=== | ||
| − | + | Kayla Argent is doing a deep cover assignment on Helios IV. While maintaining cover and dodging authorities she injures her arm in a fall. She attempts to use Streetwise to locate an underground doc to help her. | |
| + | |||
| + | The Master declares a TN of 7, and she has a skill of 3d8. | ||
| + | |||
| + | [[image:53d8.JPG]] | ||
| + | |||
| + | Success! | ||
| + | |||
| + | Sid Scorpio enters a high stakes gambling event on Casino Galactica. Certain of his ability, he enters a card game he cannot even pronounce. | ||
| + | |||
| + | "No problem, Im an accomplished gambler. Cards is cards." | ||
| + | |||
| + | Sid has 3d10 in gambling. The opponents are skilled players, which normally sets the TN at 7, but because Sid does not even know the rules the Master increases the TN to 9. | ||
| + | |||
| + | [[image:43d10.JPG]] | ||
| + | |||
| + | Uh oh, an 8 will not do it. Noticing his table cash getting uncomfortably low, Sid looks for a way out. The pit boss and bouncer have other ideas. | ||
==Exceptional Results== | ==Exceptional Results== | ||
| − | Great stories are filled with instances of characters performing extraordinary actions. Future Imperfect seeks to simulate this with extraordinary results. Previously, it was mentioned that most results | + | Great stories are filled with instances of characters performing extraordinary actions. Future Imperfect seeks to simulate this with extraordinary results. Previously, it was mentioned that most results will be less than or equal to the number atop the column. In some cases, results that are equal to or greater than that number will be shaded in yellow, bold and italicized<nowiki>*</nowiki>. These are exceptional results. |
| − | Exceptional results allow results to be open ended. When one of the | + | Exceptional results allow results to be open ended. When one of the cells in the result set meet the criteria above, immediately draw another card and add the value from the corresponding cell to the previous result. If another exceptional result is drawn, repeat the procedure until a standard result is drawn. Only the necessary cells are used, everything else on these additionally drawn cards is ignored, so they may be immediately discarded after combining the results. |
| − | Unlike standard skill checks, exceptional results use ''the exact cell only'', lower results may not be selected. In other words if the exceptional result is in 2-10 (as in 34, above), then only the 2-10 result in the next card may be chosen. If multiple cells within the result set display exceptional results, either may be selected after drawing the new card. | + | Unlike standard skill checks, exceptional results use ''the exact cell only'', lower results may not be selected. In other words if the exceptional result is in 2-10 (as in 34, above), then only the 2-10 result in the next (and subsequent) card(s) may be chosen. If multiple cells within the result set display exceptional results, either may be selected after drawing the new card, but the same rules apply. See example 3, below, for more on this possibility. |
Exceptional results are optional. | Exceptional results are optional. | ||
| − | <nowiki>*</nowiki>See the Appendix | + | <nowiki>*</nowiki>See the [[Future_Imperfect:_Appendix_-_1,_Action_Cards|Appendix]] for the rationale behind the symbology. |
===Exceptional Results, Example 1: Sid being Sid=== | ===Exceptional Results, Example 1: Sid being Sid=== | ||
| − | Sid Scorpio (played by Sid...seriously) is attempting to elude 3 GPR commissars who wish to question him after his baggage was searched and found to contain a coagulator, contraband on this planet. | + | Sid Scorpio (played by Sid...seriously) is attempting to elude 3 GPR commissars who wish to question him after his baggage was searched and found to contain a coagulator, contraband on this planet. Having sprinted from the spaceport, he is looking for the fastest route to anywhere but here. With the commissars hot on his trail, he knows that his situation is desperate so he decides to attempt something truly crazy (well, crazy for someone who isnt Sid Scorpio...). He runs along the arrivals path and leaps up, attempting to grab the bumper of a passing hover taxi. |
| − | The Master declares this to be an incredibly difficult task, and assigns a TN of 11. Sid just smiles | + | The Master declares this to be an incredibly difficult task, and assigns a TN of 11. Sid just smiles, says, "Its in the bag," and draws a card. |
[[image:exceptional.JPG]] | [[image:exceptional.JPG]] | ||
| − | Sid Scorpio has a Dexterity of 2d10. Consulting the card drawn, | + | Sid Scorpio has a Dexterity of 2d10. Consulting the card drawn, 14, he finds 9 and 12, the latter denoting an exceptional result. "See, I told you.", says Sid (the player), and he draws another card, 5. Cross referencing the 2-10 result he finds a 9, making his total 21. |
"Piece of cake" Sid grabs the bumper, looks back at the commissars, smiles and winks. "Too-da-loo, gents." | "Piece of cake" Sid grabs the bumper, looks back at the commissars, smiles and winks. "Too-da-loo, gents." | ||
| − | Note: If optional rules for bumps were used, he would have achieved 2. See the section on bumps, below. | + | Note: If optional rules for bumps were used, he would have achieved 2. See the section on bumps, [[Future_Imperfect_-_Action_Cards#Optional_Results:_Bumps|below]]. |
===Exceptional Results, Example 2: Xenes Does the Heavy Lifting=== | ===Exceptional Results, Example 2: Xenes Does the Heavy Lifting=== | ||
| Line 62: | Line 126: | ||
[[image:exceptional-2.JPG]] | [[image:exceptional-2.JPG]] | ||
| − | Xenes has 4d10 in CompTech: Hacking. Glancing over the results, he is pleased to find | + | Xenes has 4d10 in CompTech: Hacking. Glancing over the results, he is pleased to find 9, 6, 10, and 7, including an exceptional result. "This just might work", says Eric as he draws another card, 6. Fortuitously, another exceptional result! Drawing again, he reveals the 5 card. Adding the results gives a 21. Click, click, delete. |
| − | Note that even though Xenes has a 4d10 in Hacking, he cannot choose the | + | Note that even though Xenes has a 4d10 in Hacking, he cannot choose the 9 result on the 5 card, because only the 3-10 cell can be used in this draw. Also, even though the 4-10 result in card 5 is CF, and his skill is 4d10, this does not cause a critical failure. Critical failures can only occur on the ''card drawn to resolve the action'', the additional cards drawn for the exceptional result are optional, and only serve to extend the initial card. This also explains why only the 3-10 cell is relevant, in effect only that "die" is rolled, no further action is attempted. |
| − | Finally, if the optional bump rules (see below) were being used, Xenes would have generated | + | Finally, if the optional bump rules (see [[Future_Imperfect_-_Action_Cards#Optional_Results:_Bumps|below]]) were being used, Xenes would have generated 2 bumps. |
| − | ===Exceptional Results, Example 3: === | + | ===Exceptional Results, Example 3: Chuk in the Muck=== |
| − | + | Finding himself thigh-deep in muck while doing a job on the Mertun homeworld, Chuk has certainly had better days. It just gets worse when his blast MMG malfunctions while he is trying to keep a squad of the planetary hosts at bay. Knowing he has little time, and that in their walkers they can cover distance quite quickly, Chuk begins trying to restore his trusty sidekick. | |
| + | |||
| + | The Master declares the TN 5, since it is a relatively normal weapon malfunction. The issue is Chuk does not know the cause of the breakdown, so he will need to troubleshoot the issue. Chuk is very skilled with his blast MMG, having 3 dice, however his Intellect is only d4. Normally with the MMG he is shooting trouble, with Dexterity, not troubleshooting, with Intellect. | ||
| + | |||
| + | Having no other option, he draws. | ||
[[image:exceptional-3.JPG]] | [[image:exceptional-3.JPG]] | ||
| + | |||
| + | Hmm, not bad. Card 7 has two exceptional results! Drawing another, he spies the two corresponding cells and chooses a result of 10 (7+2 vs 6+4). Success (and a bump, if [[Future_Imperfect_-_Action_Cards#Optional_Results:_Bumps|those rules]] are used). | ||
==Critical Failures== | ==Critical Failures== | ||
| Line 81: | Line 151: | ||
[[image:criticalfail.JPG]] | [[image:criticalfail.JPG]] | ||
| + | |||
| + | For all other purposes, a CF result counts as a 0. | ||
<nowiki>*</nowiki>In Future Imperfect, all actions can be resolved by a single card draw. This card is called the resolution card. Some optional effects, such as exceptional results, can trigger further draws. These draws extend the result on the resolution card, and are never counted for critical failures in any way. | <nowiki>*</nowiki>In Future Imperfect, all actions can be resolved by a single card draw. This card is called the resolution card. Some optional effects, such as exceptional results, can trigger further draws. These draws extend the result on the resolution card, and are never counted for critical failures in any way. | ||
==Complex Skill Checks: More Than a Binary Result== | ==Complex Skill Checks: More Than a Binary Result== | ||
| − | In some cases, an action requires more than a pass or fail. These actions are called complex skill checks. | + | In some cases, an action requires more than a pass or fail. These actions are called complex skill checks. This type of check generates a binary pass/fail, and if successful, a magnitude defining how successful the action was. |
| − | These types of checks could be due to extended actions (where success is achieved over time such as defeating a complex security system), contests (where two characters compete at a task), actions involving a magnitude rather than a binary success (such as throwing an item for distance), combat actions, or other possibilities as defined by the Master. | + | Complex skill checks take simple skill checks one step further, and use two sections of the card: the cause grid (like simple skill checks) and the effect grid. These types of checks could be due to extended actions (where success is achieved over time such as defeating a complex security system), contests (where two characters compete at a task), actions involving a magnitude rather than a binary success (such as throwing an item for distance), combat actions, or other possibilities as defined by the Master. |
| − | As with simple skill checks, the cause grid is used to determine whether an action is a success. The effect grid is used to determine the magnitude, if necessary. Without a success, no magnitude is generated. An action card is discarded after one resolution (successful or not). | + | Referencing Action Card Concept 1, use the cause grid and effect grid, and ''ignore everything else''. As with simple skill checks, the cause grid is used to determine whether an action is a success. The effect grid is used to determine the magnitude, if necessary. Without a success, no magnitude is generated. An action card is discarded after one resolution (successful or not). |
===Using the Effect Grid=== | ===Using the Effect Grid=== | ||
| − | Unlike the cause grid, the results in the effect grid are always arranged in order of increasing value as the row increases. The rationale for the arrangement of values in the grids is covered in the appendix | + | Unlike the cause grid, the results in the effect grid are always arranged in order of increasing value as the row increases. The rationale for the arrangement of values in the grids is covered in the [[Future_Imperfect:_Appendix_-_1,_Action_Cards#The_Effect_Section|appendix]]. Because of this, the cell corresponding to the appropriate row and column is always chosen. |
===Generating Victories=== | ===Generating Victories=== | ||
| − | The value in the given cell is the magnitude of the action, but this by itself does not provide all of the information needed. Victory has a target of 6. This means that for each multiple of 6<nowiki>*</nowiki> in the magnitude, one victory is generated. For example, in the 34 card (below), the ( | + | The value in the given cell is the magnitude of the action, but this by itself does not provide all of the information needed. Victory has a target of 6. This means that for each multiple of 6<nowiki>*</nowiki> in the magnitude, one victory is generated. For example, in the 34 card (below), the (4)d6 effect grid result would generate one victory, because the magnitude is 9. Unless specified otherwise, any amount over the target is lost, in this case, 3. |
[[image:victories.JPG]] | [[image:victories.JPG]] | ||
| Line 101: | Line 173: | ||
When performing a complex action that requires multiple victories, the Master will inform the player of the required number of victories before they make their attempt. | When performing a complex action that requires multiple victories, the Master will inform the player of the required number of victories before they make their attempt. | ||
| − | <nowiki>*</nowiki>See the appendix | + | <nowiki>*</nowiki>See the [[Future_Imperfect:_Appendix_-_1,_Action_Cards#Generating_Victories_and_Wounds|appendix]] for more on the target victory magnitude of 6. |
===Complex Skill Checks, Example 1: Kayla Argent Disables a Force Field=== | ===Complex Skill Checks, Example 1: Kayla Argent Disables a Force Field=== | ||
After spending the night moving carefully through Azuriach held ground, Kayla has determined that her compatriot Oso is being detained in a subterranean cell beneath a guard tower. She knows the tower is protected by a force field, so her only hope of gaining access and freeing Oso requires finding an access panel and disabling the field. Utilizing her trademark patience and precision, she systematically narrows the possible locations to a single wall section, and deftly approaches the hidden access panel. | After spending the night moving carefully through Azuriach held ground, Kayla has determined that her compatriot Oso is being detained in a subterranean cell beneath a guard tower. She knows the tower is protected by a force field, so her only hope of gaining access and freeing Oso requires finding an access panel and disabling the field. Utilizing her trademark patience and precision, she systematically narrows the possible locations to a single wall section, and deftly approaches the hidden access panel. | ||
| − | After opening the panel, she | + | After opening the panel, she assesses the security system and determines that it is a difficult and potentially time consuming operation. Just then, she hears the door at the top of the stairs open, and two sets of footsteps are descending toward her. The Master informs her that it will require 5 victories to disable the alarm. The security system is TN 7. She draws the following card: |
| − | [[image: | + | [[image:card3.JPG]] |
| − | Kayla has 4d8 in Security Systems, and she is using a TL 8 encryption/decryption scope (3)d10. Consulting the card, she finds that she has succeeded ( | + | Kayla has 4d8 in Security Systems, and she is using a TL 8 encryption/decryption scope (3)d10. Consulting the card, she finds that she has succeeded (2, 4, 5, 7 vs TN 7). |
| − | [[image: | + | [[image:3cause.JPG]] |
Excellent. Now to determine how much progress is made this round. | Excellent. Now to determine how much progress is made this round. | ||
| − | [[image: | + | [[image:3effect.JPG]] |
| − | The quality of the equipment, (3)d10, is used to generate the effect. | + | The quality of the equipment, (3)d10, is used to generate the effect. With the standard effect threshold of 6, the 25 magnitude generates four victories. Note that unlike reading the cause grid, in the effect grid only the exact cell referenced is necessary. |
| − | + | One more to go, Kayla knows she needs to step up her game if she is to deactivate the field quickly enough to be able to handle the approaching guards as well. | |
| − | ===Complex Skill Checks, Example 2: === | + | ===Complex Skill Checks, Example 2: Oso Knows=== |
| + | Kayla and Oso have made it back to their shuttle and found that local scavengers have stripped some necessary hardware. The Azuriach authorities are hot on their tail, so Oso knows he has to get this bucket shipshape, and fast. Kayla says she can hold them at bay for a few minutes, but he needs to hurry. Oso gets to work. | ||
| + | |||
| + | Once inside Oso decides to cannibalize non-vital systems so he can jury-rig something to get them in orbit. The Master declares this a TN 7, with 6 victories required. Oso has a strong Engineering skill, 3d10, but only rudimentary tools, (3)d6. | ||
| + | |||
| + | [[image:153d10.JPG]] | ||
| + | |||
| + | He gets an 8. Progress. But how much? | ||
| + | |||
| + | [[image:153d6-e.JPG]] | ||
| + | |||
| + | Just what the doctor ordered, an exceptional success! His total of 26 scores 4 victories right out of the gate. "Great news, Kayla, we had some spare parts I forgot about!" | ||
=Combat Actions= | =Combat Actions= | ||
| − | Combat actions can potentially use the entire action card. Each section will be covered individually, in sequence, with | + | Combat actions can potentially use the entire action card. Each section will be covered individually, in sequence, with a continuing example. Future Imperfect is designed to be played with an action deck and a character sheet, no other accessories are needed (ok, maybe a pencil and a drink of choice). To that end, the character sheet is crafted to make the most complex actions, simple. |
| + | |||
| + | On the back of the character sheet is a combat reference aid. It is designed to hold a card in the center, in the rectangle, and contains handy information about card symbols and game mechanics. When it is time to resolve an action, draw a card and place it in the space indicated. | ||
| + | |||
| + | [[image:combatreference.JPG]] | ||
| + | |||
| + | Skills are organized by die type. The arrows will point to the appropriate column. | ||
==Resolution Flow== | ==Resolution Flow== | ||
| − | The order of operations is similar to other games: | + | Cards are designed to begin in the upper left and flow down and to the right. The order of the sections is outlined below, but remember to only use what you need. The sequence of operations is similar to other games: [[image:cardsequence.JPG|right]] |
1. Determine hit or miss. If miss, proceed to step 6.<br> | 1. Determine hit or miss. If miss, proceed to step 6.<br> | ||
2. Determine number of hits. <br> | 2. Determine number of hits. <br> | ||
| − | 3. Determine hit location(s). <br> | + | 3. Determine hit location(s).<br> |
| − | 4. Check for armor penetration/ablation. If no penetration, proceed to step 6.<br> | + | 4. Check for armor penetration/ablation. If no penetration, proceed to step 6.<br> |
5. Determine damage.<br> | 5. Determine damage.<br> | ||
6. Check for ancillary effects. | 6. Check for ancillary effects. | ||
| − | All results are found on a single card. At the conclusion of the resolution, discard the card. | + | All results are found on a single card. See diagram at right for order of operations map. At the conclusion of the resolution, discard the card. |
| + | |||
| + | Step 1 is for determining success or failure, see the simple skill check section for more on using this feature. Step 2 is for burst fire, if only a single shot is attempted, skip this section. Using this section is described below. Step 3 is hit location. Step 4 is armor penetration/ablation, described below. Step 5 is damage, see complex task resolution for instructions on to use this feature. Step 6, ancillary results, are covered below. | ||
==Determining Hits== | ==Determining Hits== | ||
| Line 147: | Line 238: | ||
The range is close for a blast MMG, which makes the TN 5. Because the MMG is a heavy weapon, it only operates in fully automatic mode, so it will be delivering burst 10. The following card (50) is drawn: | The range is close for a blast MMG, which makes the TN 5. Because the MMG is a heavy weapon, it only operates in fully automatic mode, so it will be delivering burst 10. The following card (50) is drawn: | ||
| − | [[image: | + | [[image:503d10.JPG]] |
| − | Chuk has | + | Chuk has 3d10 in Blast Heavy Weapons. The results 8, 1, 3 indicate a hit. These klackons just started having a really bad day. |
==Burst Fire== | ==Burst Fire== | ||
| − | Some weapons are capable of firing more than one shot in a single action. These weapons use the burst section of the action card. If a hit is scored, check the appropriate burst result to see how many shots hit. Weapons that are capable of firing in more than one mode are assumed to fire the minimum number of shots unless specified otherwise. | + | Some weapons are capable of firing more than one shot in a single action. These weapons use the burst section of the action card. If a hit is scored, check the appropriate burst result to see how many shots hit. Weapons that are capable of firing in more than one mode are assumed to fire the minimum number of shots unless specified otherwise. The burst fire chart is located beneath the cause grid in the upper results. |
[[image:burst.JPG]] | [[image:burst.JPG]] | ||
| − | The number to the left is the burst value, which indicates the number of projectiles fired. The number to the right | + | The number to the left, within the burst icon, is the burst value, which indicates the number of projectiles fired. The number to the right is the number of actual hits (or successes) scored. The difference between the burst value and the number of hits is called stray shots (used with optional unintended targets rules). Each hit after the first in a given location increases the row on the effect grid by 1 (so (3)d6 becomes (4)d6). Alternatively, if bumps are used, each additional hit after the first adds one conditional "damage only" bump. |
See the action card appendix for more on burst fire results. | See the action card appendix for more on burst fire results. | ||
| Line 166: | Line 257: | ||
===Combat Example, Chuk vs Klackons, continued=== | ===Combat Example, Chuk vs Klackons, continued=== | ||
| − | + | Holding his ground, Chuk unleashes a withering hail of blast fire into the approaching klackons. A blast MMG can only fire in full auto mode, so it uses the 10 burst section. How many projectiles find home? | |
[[image:50burst.JPG]] | [[image:50burst.JPG]] | ||
| − | Wow, 8 rounds plow into the lead klackon. | + | Wow, 8 rounds plow into the lead klackon. |
==Hit Location== | ==Hit Location== | ||
| − | To the left of the | + | To the left of the effect grid is a set of four rectangles. Each of these contain a hit location. |
[[image:hitlocation.JPG]] | [[image:hitlocation.JPG]] | ||
| − | The second rectangle from the bottom | + | The second rectangle from the bottom is italicized and bold. This is the standard hit location. The other hit locations are used with the optional bump rules (see below) as well as with positional adjustments such as advantages of high ground. Consult the conflict chapter for more on hit locations. |
| + | |||
| + | Next to all the rectangles except the standard hit location is either 1 or 2 triangle arrows. These arrows represent both direction and cost. Each triangle is one bump to change to that location, and the direction is either up or down. The hit location bank is a stack of rectangles, and the results are arranged to generally move up the body (toward the head) as you move up in the stack. When results are within the same location, thematically it can be assumed that higher in the stack is a higher spot within the location. Sometimes results will go from side to side, such as right to left arm or leg. In this case, even though they are arranged on top of one another, the location change is horizontal. | ||
| + | |||
| + | Your Crew can interpret the results horizontally and vertically however they wish. These thematic options are suggestions, only, intended to help visualize the action. | ||
===Combat Example, Chuk vs Klackons, continued=== | ===Combat Example, Chuk vs Klackons, continued=== | ||
| Line 187: | Line 282: | ||
Successfully placing ordinance on a target is one thing, penetrating the protection of said target is another. Each weapon has a penetration value and type, as well as tech level. Armor has protection values versus multiple attack types, as well as a tech level. Most natural armors, such as the shell of a turtle, have an effective tech level as well even though they are not technological per se. Many spacefaring creatures have natural armor that has no tech level, these creatures ignore the tech level of all weapons. | Successfully placing ordinance on a target is one thing, penetrating the protection of said target is another. Each weapon has a penetration value and type, as well as tech level. Armor has protection values versus multiple attack types, as well as a tech level. Most natural armors, such as the shell of a turtle, have an effective tech level as well even though they are not technological per se. Many spacefaring creatures have natural armor that has no tech level, these creatures ignore the tech level of all weapons. | ||
| − | Each action card has a shield icon to the | + | Each action card has a shield icon to the left of the effect grid. Inside the shield is a number from -2 to +2. This number is applied to the penetration value of the attack before comparing it to the protection value of the armor. The resulting number is known as the Effective Penetration (EP). |
[[image:penetration-2.JPG]] | [[image:penetration-2.JPG]] | ||
| Line 196: | Line 291: | ||
===Tech Level and Armor Penetration/Ablation=== | ===Tech Level and Armor Penetration/Ablation=== | ||
| − | Tech level has some effect on this, but it is yet undetermined. | + | Tech level has some effect on this, but it is as yet undetermined. |
===Burst Fire and Armor Penetration/Ablation=== | ===Burst Fire and Armor Penetration/Ablation=== | ||
| Line 202: | Line 297: | ||
===Combat Example, Chuk vs Klackons, continued=== | ===Combat Example, Chuk vs Klackons, continued=== | ||
| − | Now for the moment of truth. Can the charging klackons withstand the destruction wrought by Chuk and his blast MMG? Blast MMGs are TL 8, Penetration 8, and are energy weapons. Klackons have natural armor (no tech level), protection 6 in chest/belly, 5 everywhere else. | + | Now for the moment of truth. Can the charging klackons withstand the destruction wrought by Chuk and his blast MMG? Blast MMGs are TL 8, Penetration 8, and are energy weapons. Klackons have natural armor (no tech level), protection 6 in chest/belly, 5 everywhere else versus energy. For this attack, the klackon has 5 armor. |
| − | [[image: | + | [[image:50penetration.JPG]] |
| − | The blast MMG penetrates the left leg, dealing full damage (4)d10. The protection value for this klackon is reduced to 4 in his | + | The blast MMG penetrates the left leg, dealing full damage: (4)d10. The protection value for this klackon is reduced to 4 in his right leg. |
==Dealing Damage== | ==Dealing Damage== | ||
| − | Damage is applied exactly as described in complex tasks. The only difference between collecting victories and assigning wounds is that any leftover effect magnitude is applied as concussion. | + | Damage is applied exactly as described in complex tasks. The only difference between collecting victories and assigning wounds is that any leftover effect magnitude is applied as concussion. See the Conflict chapter for more on dealing damage. |
===Combat Example, Chuk vs Klackons, continued=== | ===Combat Example, Chuk vs Klackons, continued=== | ||
| − | The blast MMG penetrated the leg armor of the klackon, dealing (4)d10. Because 8 shots hit, the damage value is increased by 7 (one for each shot after the first). There are only 7 rows in the effect grid, so any leftover bonus after the 7th row is added directly to the magnitude. This makes the effect result (7)d10+4. The magnitude is | + | The blast MMG penetrated the leg armor of the klackon, dealing (4)d10. Because 8 shots hit, the damage value is increased by 7 (one for each shot after the first). There are only 7 rows in the effect grid, so any leftover bonus after the 7th row is added directly to the magnitude. This makes the effect result (7)d10+4. The magnitude is 49 (45 +4). |
[[image:50damage.JPG]] | [[image:50damage.JPG]] | ||
| − | The shot deals 5 wounds and | + | The shot deals 5 wounds and 19 concussion. Normally, this amount of damage would deal 8 wounds before converting to concussion. However, no limb can take more than 5 wounds before being destroyed/severed. The klackon loses the leg, must make a concussion save, and a death save. See the Conflict chapter for rules on how to do this. |
==Ancillary Effects== | ==Ancillary Effects== | ||
| − | Once all hits are applied, the next step is determining if any other effects occur. There are two possible ancillary effects: equipment failure and unintended targets. Equipment failure is represented by a wrench icon located just | + | Once all hits are applied, the next step is determining if any other effects occur. There are two possible ancillary effects: equipment failure and unintended targets. Equipment failure is represented by a wrench icon located just above the scatter clock face. |
[[image:breakage.JPG]] | [[image:breakage.JPG]] | ||
| − | If a broken wrench with a number | + | If a broken wrench with a number superimposed on it is present, that number is compared to the reliability of the equipment to determine if a breakage occurs (equipment fails when the result over the wrench is below the equipment reliability). If an intact wrench appears, this section can be ignored. See the gear chapter for more information on equipment reliability. |
| − | The second possible ancillary effect is unintended targets. Before any ranged shot is attempted, the Master | + | The second possible ancillary effect is unintended targets. Before any ranged shot is attempted, the Master may inform the player of potential unintended targets (in the case of other PCs or important NPCs or terrain features, the Master should inform the player ''before'' the shot is attempted). Generally, unintended targets are within one meter of the firing path of the weapon. Unintended targets may be living or otherwise, such as windows, breakable objects, etc. See the Conflict chapter for more on determining potential unintended targets. |
[[image:unintended.jpg]] | [[image:unintended.jpg]] | ||
| − | Unintended targets | + | Compare the number of stray shots to the numbers superimposed over the figure icons. If the number of stray shots is equal to or greater than any of these numbers, an unintended target is hit. Note that multiple unintended targets can be hit in a single shot if multiple targets are indicated. |
| + | |||
| + | In most circumstances the closest or most obvious unintended target is hit first. Unintended targets can be used to increase immersion and drama during scenes. Missed shots have to go somewhere. The Master has final determination of which unintended targets are hit, however it is suggested that players be made aware of possible unintended targets before attempting a shot. | ||
| + | |||
| + | See the Conflict chapter for more on unintended targets. The action card appendix discusses how unintended targets are determined, as well as an alternate method for using the unintended target track. | ||
===Combat Example, Chuk vs Klackons, conclusion=== | ===Combat Example, Chuk vs Klackons, conclusion=== | ||
Now that the damage has been dealt, the remaining possible effects must be determined, if any. First, check for equipment failure. | Now that the damage has been dealt, the remaining possible effects must be determined, if any. First, check for equipment failure. | ||
| − | [[image: | + | [[image:50breakage.JPG]] |
Since an intact wrench is present, there is no possibility of equipment failure. | Since an intact wrench is present, there is no possibility of equipment failure. | ||
| Line 242: | Line 341: | ||
[[image:50unintended.JPG]] | [[image:50unintended.JPG]] | ||
| − | + | Since there are two stray shots, and the icon has a 3, no unintended targets are struck. Had there been one more stray shot, the other klackon would have been hit. | |
| + | |||
| + | =Shuffling= | ||
| + | The action card deck should be shuffled before any action scene. Also, if at any time a card is drawn that has SHUFFLE written across the left edge, complete the current resolution, and then, before proceeding, combine the deck and discard pile and reshuffle the deck. | ||
| + | |||
| + | =Optional Results: Bumps= | ||
| + | Heroes perform actions with style and pizzazz. Sometimes, this means they succeed when others might fail. Sometimes they do things that seem impossible. Sometimes they just add an extra helping of cool to the performance. Bumps can help facilitate this at the table. | ||
| + | |||
| + | Whenever a task is attempted, the Master will provide a TN for success. If the result generated exceeds the TN by 4 or more, a bump has been achieved. For each full multiple of 4 above the TN one bump is awarded. For a TN 5 task, bumps would occur on 9, 13, 17, etc. | ||
| + | |||
| + | ==Using Bumps== | ||
| + | For each bump the player may invoke any of a number of possible choices. Bumps may be used to change hit location. They can increase penetration value (or cause increased ablation). They can add damage. They can grant the player a minor action to perform along with the current action. Bumps do not persist, so use 'em when you get 'em. Players can freely choose how to use their bumps, but the Master has final say over any added minor action or anything not explicitly defined on the action card. | ||
| + | |||
| + | While the options are many, using bumps in play is quite simple. One advantage action cards have over dice is that by visually having the options present on the card, it serves as a reminder of what is possible. This leads to fewer instances of special abilities being forgotten or neglected in the crunch time of action. | ||
| + | |||
| + | ==Bumping Hit Location== | ||
| + | If you recall, the hit location bank includes 4 possible hit locations. By using 1 bump, the hit location may be moved up or down one spot in the hit location bank. For example, see the following diagram: | ||
| + | |||
| + | [[image:locationbump.JPG]] | ||
| + | |||
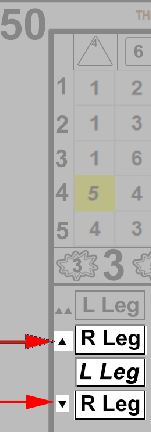
| + | The card pictured (50) shows a standard hit location of left leg. Bumping up or down has the same effect, in this case (changing legs), and, if two bumps were available, the hit location would revert back to the left leg. | ||
| + | |||
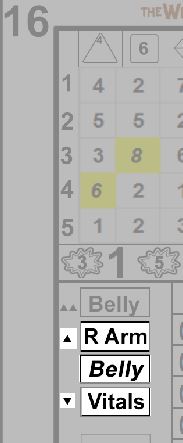
| + | Another example, this time using card 16 illustrates a much more advantageous usage of location bumping. | ||
| + | |||
| + | [[image:locationbump2.JPG]] | ||
| + | |||
| + | In this case, the standard hit location is belly, but with a single bump the location can be changed to either the right arm or vitals. | ||
| + | |||
| + | In all cases, the triangles (up or down) denote the number of bumps necessary to select the alternate location, and the direction of the apex indicates the general direction of the location change. | ||
| + | |||
| + | ==Bumping Penetration== | ||
| + | Each weapon in Future Imperfect has a penetration value. This value is used to both penetrate and damage armor. Skilled combatants are consistently able to find weak points in enemy defenses, and bumping penetration simulates this. | ||
| + | |||
| + | Bumping penetration is simple. The penetration modifier, shown in the shield, may be increased by one for each bump spent. This cannot be used to increase the penetration modifier above +2. Any increase above +2 is two bumps per increase. | ||
| + | |||
| + | [[image:50penetration.JPG]] | ||
| + | |||
| + | The card shown here has a 0 penetration modifier. To increase it to +1 would cost 1 bump, and to +2 would cost 2. Increasing it to +3, however, would cost 4 bumps. | ||
| + | |||
| + | Bumps may also be used to increase ablation. One bump may be spent to reduce the armor value by one additional point. Alternatively, it may instead ablate the armor value at a secondary location instead (this does not cause a wound there, or move the current hit to that location). | ||
| + | |||
| + | ==Bumping Damage or Effect Magnitude== | ||
| + | Bumping damage is the most straight-forward bump spend. For each two bumps spent, increase the row value of the effect by one. Effect cannot be bumped below row (7). Bumping effect magnitude (for generating victories) works in exactly the same way. Bumping damage or effect magnitude is limited only by the row 7 rule, above. | ||
| + | |||
| + | ==Minor Actions== | ||
| + | Adding a minor action to the just resolved action is also feasible. This type of bump spend is subject to Master approval. Some examples of minor actions that can be added include swapping out a magazine, ducking behind cover, pointing out a scene detail to your comrades, jumping onto a chair, or anything else that increases the drama and story in the space of a second or two. | ||
| + | |||
| + | ==Bumping Stray Shots== | ||
| + | Bumps might potentially be used to increase the number of shots in a burst that hit, and may also be used to bump between unintended targets. Rules as yet to come. | ||
| + | |||
| + | =Initiative= | ||
| + | One section of the action cards that has been mentioned, but not discussed, is initiative. The initiative key and bar are located on the left side of the card. Unlike many of the entries previously discussed on this page, the initiative section requires a full rules explanation to fully understand the usage. Therefore, the initiative chapter is integrated with an action card based tutorial: [[Future_Imperfect_-_Initiative_and_Action_Speeds]] | ||
| + | |||
| + | =Card Deck= | ||
| + | A set of the cards is available in jpg format here: https://www.dropbox.com/s/cao1a1la2euq43h/5.3.zip?dl=0 | ||
Latest revision as of 23:02, 10 April 2019
Action cards are at the heart of Future Imperfect. Whenever success is in doubt, action cards will help you determine the result. In this section action card usage will be explained in a step by step manner. For further information about card anatomy, card creation or alternative card usages, see Future Imperfect: Appendix - 1, Action Cards.
This chapter is intended to provide an overview of how to use the action cards. It is not intended as a full rules explanation. Some elements of the rules need to be explained to provide the necessary context for understanding card usage, but it is in no way complete. Please reference the appropriate rulebook chapters for comprehensive rules explanations.
Contents
- 1 Reading Cards
- 2 Performing Skill and Attribute Checks
- 3 Combat Actions
- 4 Shuffling
- 5 Optional Results: Bumps
- 6 Initiative
- 7 Card Deck
Reading Cards
The Action Cards included with Future Imperfect are loaded with data. The sheer volume of information may seem daunting at first, yet once their usage is mastered they become simple and quick to utilize. Note that even in the most detailed of actions only a subset of the information contained will be referenced. In most cases only one or two sections will be necessary.
The card is divided into sections. A streamlined overview of what is where is below.
The image above is labeled according to the most common usages of the card. The concept is to distill the sections into single entities. There may be 25 numbers in a bank in the upper grid (discussed below), but functionally, it is just a single thing.
To learn how to read a card, begin by drawing one and examining the card face.
Consider the entry in the upper left corner of the card, only. Do not let the information density overwhelm you at first glance. The cards have enough information to resolve any kind of action, in any situation. But in any given action, only a small subset of the entries will be consulted. To avoid information overload, concentrate only on the entries needed for the action you are currently resolving. This step by step guide will show you how to use each section in turn, and provide concrete examples to bring the knowledge together into a useful form.
Action card concept 1: Use what you need, ignore everything else.
The example card is number 34. When cards are referenced, the large number in the upper left is the unique identifying number. Anytime the rulebook refers to a card, it will reference this number. These numbers range from 0-53, as discussed here.
Each card is divided into three sections,
the outer edge, containing the following information:
1. Initiative bar (discussed here)
2. Unintended targets (ancillary effects, below)
3. Corner results (appendix).
The upper results, containing:
1. Cause grid (next section, skill checks)
2. Equipment Failure (ancillary effects, below)
3. Scatter (ancillary effects, below)
4. Burst results (combat, below)
And the lower results, consisting of:
1. Effect grid (complex skill checks, below)
2. Hit locations (combat, below).
3. Armor penetration (combat, below).
Nomenclature
When speaking of a single given cell in the cause grid, the convention is row-column, such as 3-8, for the d8 cell that has an 3 result (third row, above). When speaking of a result set, where multiple dice of a given type are rolled, the standard RPG convention of [row]d[column] is used, so for 3d8, the results of 7, 7 and 3 would be included (again, using the above image). In the effect grid the convention is the same, except the row labels are enclosed in parentheses, so the 4th entry in the d8 column is (4)-8.
Now that you are oriented and informed on card notation, the first step is learning the simplest task, a basic skill check.
Performing Skill and Attribute Checks
Roleplaying games are predicated on characters doing interesting things. Many times, those things may fail. When success is not guaranteed, action cards are used to determine the outcome. The process is detailed below.
The Cause Grid: Simple Skill Checks
Skill checks can be performed using only a single result from the card. In the upper section of the card is a 5x5 grid, with rows numbered from 1-5, and columns with 4, 6, 8, 10 and 12, along with symbols matching the shape of dice with the given number of sides.
Do not worry, dice never need to be rolled in conjunction with action cards.
Then why are the dice symbols present? As a player of roleplaying games, you are likely familiar with polyhedral dice. If this is your first roleplaying game, you may have seen the 6 sided cube that is used in table games such as craps to board and roleplaying games like Monopoly and Dungeons & Dragons as well. The dice symbols help to set expectations for players on what results are likely to occur in a given column*. The 6 column, for example, acts like the standard six sided cube. Most results in the 6 column will fall within the range of 1-6, while the results in the 10 column will fall mostly from 1-10. A full explanation for how the results are distributed is available in the appendix.
Simple skill checks use only the cause grid. This means, according to Concept 1, everything else on the card should be ignored. All you need is a number of rows equal to the skill level of the skill being used and a column representing the die type of the appropriate trait (illustrated below).
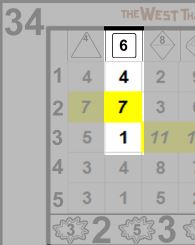
Each row is an additional die of the appropriate type. When a skill level is greater than one, the player resolving the action may choose any result from a row equal to or less than the level of the skill, in the appropriate column based on the governing trait. The only exception to this is critical failures, discussed in the special section below. For example, if Sid Scorpio has an Essence of d6, and a Bravery of 3, he may choose either 4, 7 (why is this result highlighted? See exceptional results, below) or 1 (assuming card 34, above, as the card drawn).
Skill checks are that simple. Draw a card, cross-reference the die type of the appropriate trait with the skill level of the skill being used, and choose the result. In general, the highest result present will be chosen, though there may be reasons why another result is selected. Except in the case of critical failures the active player (the one that drew the card and is resolving the check) may always choose whichever result he wishes.
Attribute checks are performed exactly like skill checks, except the attribute level is used in place of skill level.
After completing the check, place the card in the discard pile. Even though only a small amount of the information on the card was used, each card is utilized for a single action only. In the case of a simple skill check, between 1-5 rows in a single column will be consulted, nothing more.
*You may notice a 7 in cell 2-6, and an 11 in 3-8. The results are open ended, discussed in exceptional results, below (immediately after the following examples). For more on how the results are generated and distributed, see the appendix.
Further Examples
Kayla Argent is doing a deep cover assignment on Helios IV. While maintaining cover and dodging authorities she injures her arm in a fall. She attempts to use Streetwise to locate an underground doc to help her.
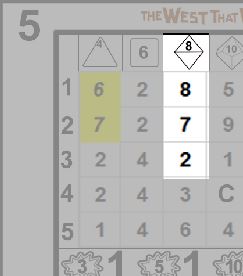
The Master declares a TN of 7, and she has a skill of 3d8.
Success!
Sid Scorpio enters a high stakes gambling event on Casino Galactica. Certain of his ability, he enters a card game he cannot even pronounce.
"No problem, Im an accomplished gambler. Cards is cards."
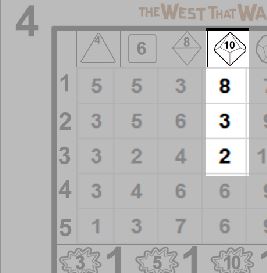
Sid has 3d10 in gambling. The opponents are skilled players, which normally sets the TN at 7, but because Sid does not even know the rules the Master increases the TN to 9.
Uh oh, an 8 will not do it. Noticing his table cash getting uncomfortably low, Sid looks for a way out. The pit boss and bouncer have other ideas.
Exceptional Results
Great stories are filled with instances of characters performing extraordinary actions. Future Imperfect seeks to simulate this with extraordinary results. Previously, it was mentioned that most results will be less than or equal to the number atop the column. In some cases, results that are equal to or greater than that number will be shaded in yellow, bold and italicized*. These are exceptional results.
Exceptional results allow results to be open ended. When one of the cells in the result set meet the criteria above, immediately draw another card and add the value from the corresponding cell to the previous result. If another exceptional result is drawn, repeat the procedure until a standard result is drawn. Only the necessary cells are used, everything else on these additionally drawn cards is ignored, so they may be immediately discarded after combining the results.
Unlike standard skill checks, exceptional results use the exact cell only, lower results may not be selected. In other words if the exceptional result is in 2-10 (as in 34, above), then only the 2-10 result in the next (and subsequent) card(s) may be chosen. If multiple cells within the result set display exceptional results, either may be selected after drawing the new card, but the same rules apply. See example 3, below, for more on this possibility.
Exceptional results are optional.
*See the Appendix for the rationale behind the symbology.
Exceptional Results, Example 1: Sid being Sid
Sid Scorpio (played by Sid...seriously) is attempting to elude 3 GPR commissars who wish to question him after his baggage was searched and found to contain a coagulator, contraband on this planet. Having sprinted from the spaceport, he is looking for the fastest route to anywhere but here. With the commissars hot on his trail, he knows that his situation is desperate so he decides to attempt something truly crazy (well, crazy for someone who isnt Sid Scorpio...). He runs along the arrivals path and leaps up, attempting to grab the bumper of a passing hover taxi.
The Master declares this to be an incredibly difficult task, and assigns a TN of 11. Sid just smiles, says, "Its in the bag," and draws a card.
Sid Scorpio has a Dexterity of 2d10. Consulting the card drawn, 14, he finds 9 and 12, the latter denoting an exceptional result. "See, I told you.", says Sid (the player), and he draws another card, 5. Cross referencing the 2-10 result he finds a 9, making his total 21.
"Piece of cake" Sid grabs the bumper, looks back at the commissars, smiles and winks. "Too-da-loo, gents."
Note: If optional rules for bumps were used, he would have achieved 2. See the section on bumps, below.
Exceptional Results, Example 2: Xenes Does the Heavy Lifting
Back on the Ball Lightning, Xenes (played by Eric) learns that Sid was caught trying to smuggle a coagulator past customs. "Unbelievable", he thinks to himself. Since Sid is a member of the crew of this vessel, his crime could prevent them from leaving spacedock, and could also cause the captain unnecessary grief from the planetary government. Xenes, never a fan of the GPR, figures that it is in the best interest of all concerned to use the shipboard computer to quickly hack in to the spaceport computer and erase the record before it gets in front of too many prying eyes.
Even though the Ball Lightning has a very powerful computer, spaceport security is tight and vigilant. The Master declares the TN a near-impossible 13. Eric nods and draws a card, 34.
Xenes has 4d10 in CompTech: Hacking. Glancing over the results, he is pleased to find 9, 6, 10, and 7, including an exceptional result. "This just might work", says Eric as he draws another card, 6. Fortuitously, another exceptional result! Drawing again, he reveals the 5 card. Adding the results gives a 21. Click, click, delete.
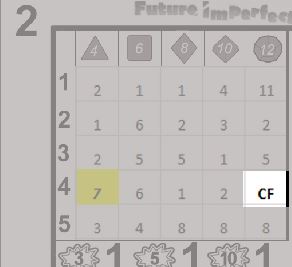
Note that even though Xenes has a 4d10 in Hacking, he cannot choose the 9 result on the 5 card, because only the 3-10 cell can be used in this draw. Also, even though the 4-10 result in card 5 is CF, and his skill is 4d10, this does not cause a critical failure. Critical failures can only occur on the card drawn to resolve the action, the additional cards drawn for the exceptional result are optional, and only serve to extend the initial card. This also explains why only the 3-10 cell is relevant, in effect only that "die" is rolled, no further action is attempted.
Finally, if the optional bump rules (see below) were being used, Xenes would have generated 2 bumps.
Exceptional Results, Example 3: Chuk in the Muck
Finding himself thigh-deep in muck while doing a job on the Mertun homeworld, Chuk has certainly had better days. It just gets worse when his blast MMG malfunctions while he is trying to keep a squad of the planetary hosts at bay. Knowing he has little time, and that in their walkers they can cover distance quite quickly, Chuk begins trying to restore his trusty sidekick.
The Master declares the TN 5, since it is a relatively normal weapon malfunction. The issue is Chuk does not know the cause of the breakdown, so he will need to troubleshoot the issue. Chuk is very skilled with his blast MMG, having 3 dice, however his Intellect is only d4. Normally with the MMG he is shooting trouble, with Dexterity, not troubleshooting, with Intellect.
Having no other option, he draws.
Hmm, not bad. Card 7 has two exceptional results! Drawing another, he spies the two corresponding cells and chooses a result of 10 (7+2 vs 6+4). Success (and a bump, if those rules are used).
Critical Failures
As with exceptional successes, entertaining stories often include spectacular failures. At times even the most skilled individual encounters a set of circumstances that cannot be resolved satisfactorily. Critical failures are results that lead to failure no matter the situation, and often can lead to the most dramatic result possible. Adjudicating critical failures is covered in section, this paragraph is solely concerned with how to read the results on the action card.
In most checks, the player can select any result in the appropriate column up to and including the row of the skill level being utilized. The exception to this is when the exact row/column combination yields a CF result. Note that it does not matter if a CF is in any other location on the card, a critical fail only occurs if the exact box directed by the attribute/skill combination on the resolution card* contains CF.
In the given card image below, if Chuk has a 4d12 Strength, and is attempting to lift a heavy bulkhead, he would critically fail. In the event of a critical fail the Master determines a result appropriate to the situation at hand, however any member of the Crew, including the player resolving the card, may make suggestions.
For all other purposes, a CF result counts as a 0.
*In Future Imperfect, all actions can be resolved by a single card draw. This card is called the resolution card. Some optional effects, such as exceptional results, can trigger further draws. These draws extend the result on the resolution card, and are never counted for critical failures in any way.
Complex Skill Checks: More Than a Binary Result
In some cases, an action requires more than a pass or fail. These actions are called complex skill checks. This type of check generates a binary pass/fail, and if successful, a magnitude defining how successful the action was.
Complex skill checks take simple skill checks one step further, and use two sections of the card: the cause grid (like simple skill checks) and the effect grid. These types of checks could be due to extended actions (where success is achieved over time such as defeating a complex security system), contests (where two characters compete at a task), actions involving a magnitude rather than a binary success (such as throwing an item for distance), combat actions, or other possibilities as defined by the Master.
Referencing Action Card Concept 1, use the cause grid and effect grid, and ignore everything else. As with simple skill checks, the cause grid is used to determine whether an action is a success. The effect grid is used to determine the magnitude, if necessary. Without a success, no magnitude is generated. An action card is discarded after one resolution (successful or not).
Using the Effect Grid
Unlike the cause grid, the results in the effect grid are always arranged in order of increasing value as the row increases. The rationale for the arrangement of values in the grids is covered in the appendix. Because of this, the cell corresponding to the appropriate row and column is always chosen.
Generating Victories
The value in the given cell is the magnitude of the action, but this by itself does not provide all of the information needed. Victory has a target of 6. This means that for each multiple of 6* in the magnitude, one victory is generated. For example, in the 34 card (below), the (4)d6 effect grid result would generate one victory, because the magnitude is 9. Unless specified otherwise, any amount over the target is lost, in this case, 3.
When performing a complex action that requires multiple victories, the Master will inform the player of the required number of victories before they make their attempt.
*See the appendix for more on the target victory magnitude of 6.
Complex Skill Checks, Example 1: Kayla Argent Disables a Force Field
After spending the night moving carefully through Azuriach held ground, Kayla has determined that her compatriot Oso is being detained in a subterranean cell beneath a guard tower. She knows the tower is protected by a force field, so her only hope of gaining access and freeing Oso requires finding an access panel and disabling the field. Utilizing her trademark patience and precision, she systematically narrows the possible locations to a single wall section, and deftly approaches the hidden access panel.
After opening the panel, she assesses the security system and determines that it is a difficult and potentially time consuming operation. Just then, she hears the door at the top of the stairs open, and two sets of footsteps are descending toward her. The Master informs her that it will require 5 victories to disable the alarm. The security system is TN 7. She draws the following card:
Kayla has 4d8 in Security Systems, and she is using a TL 8 encryption/decryption scope (3)d10. Consulting the card, she finds that she has succeeded (2, 4, 5, 7 vs TN 7).
Excellent. Now to determine how much progress is made this round.
The quality of the equipment, (3)d10, is used to generate the effect. With the standard effect threshold of 6, the 25 magnitude generates four victories. Note that unlike reading the cause grid, in the effect grid only the exact cell referenced is necessary.
One more to go, Kayla knows she needs to step up her game if she is to deactivate the field quickly enough to be able to handle the approaching guards as well.
Complex Skill Checks, Example 2: Oso Knows
Kayla and Oso have made it back to their shuttle and found that local scavengers have stripped some necessary hardware. The Azuriach authorities are hot on their tail, so Oso knows he has to get this bucket shipshape, and fast. Kayla says she can hold them at bay for a few minutes, but he needs to hurry. Oso gets to work.
Once inside Oso decides to cannibalize non-vital systems so he can jury-rig something to get them in orbit. The Master declares this a TN 7, with 6 victories required. Oso has a strong Engineering skill, 3d10, but only rudimentary tools, (3)d6.
He gets an 8. Progress. But how much?
Just what the doctor ordered, an exceptional success! His total of 26 scores 4 victories right out of the gate. "Great news, Kayla, we had some spare parts I forgot about!"
Combat Actions
Combat actions can potentially use the entire action card. Each section will be covered individually, in sequence, with a continuing example. Future Imperfect is designed to be played with an action deck and a character sheet, no other accessories are needed (ok, maybe a pencil and a drink of choice). To that end, the character sheet is crafted to make the most complex actions, simple.
On the back of the character sheet is a combat reference aid. It is designed to hold a card in the center, in the rectangle, and contains handy information about card symbols and game mechanics. When it is time to resolve an action, draw a card and place it in the space indicated.
Skills are organized by die type. The arrows will point to the appropriate column.
Resolution Flow
Cards are designed to begin in the upper left and flow down and to the right. The order of the sections is outlined below, but remember to only use what you need. The sequence of operations is similar to other games:1. Determine hit or miss. If miss, proceed to step 6.
2. Determine number of hits.
3. Determine hit location(s).
4. Check for armor penetration/ablation. If no penetration, proceed to step 6.
5. Determine damage.
6. Check for ancillary effects.
All results are found on a single card. See diagram at right for order of operations map. At the conclusion of the resolution, discard the card.
Step 1 is for determining success or failure, see the simple skill check section for more on using this feature. Step 2 is for burst fire, if only a single shot is attempted, skip this section. Using this section is described below. Step 3 is hit location. Step 4 is armor penetration/ablation, described below. Step 5 is damage, see complex task resolution for instructions on to use this feature. Step 6, ancillary results, are covered below.
Determining Hits
In combat, hits are determined exactly like simple skill checks. In ranged combat, the TN is determined by the range and weapon type, and modified based on environmental, equipment and other factors as determined by the Master. In melee combat, the TN is determined by weapon type and skill of the opponent, modified by other factors as determined by the Master. In all cases the Master will tell you the TN before a card is drawn. See the conflict chapter for a full description of combat rules.
Combat Example, Chuk vs Klackons
While his partners make their escape, Chuk drops to a knee and points his blast MMG down the hallway. He knows the klackons are close on his tail, the unnerving clicks of their claws causing his fur to dampen with sweat. After a few very long seconds, two klackon warriors barrel around the corner, and rush toward him. The psychological effects of the click-click-click cause him to hesitate for a moment, just a moment. As they scramble to within a few meters, Chuk unloads.
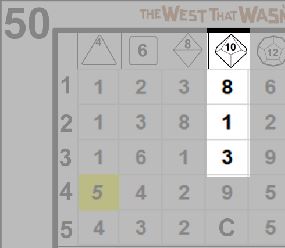
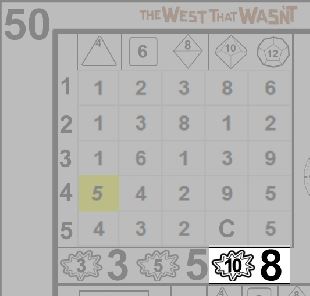
The range is close for a blast MMG, which makes the TN 5. Because the MMG is a heavy weapon, it only operates in fully automatic mode, so it will be delivering burst 10. The following card (50) is drawn:
Chuk has 3d10 in Blast Heavy Weapons. The results 8, 1, 3 indicate a hit. These klackons just started having a really bad day.
Burst Fire
Some weapons are capable of firing more than one shot in a single action. These weapons use the burst section of the action card. If a hit is scored, check the appropriate burst result to see how many shots hit. Weapons that are capable of firing in more than one mode are assumed to fire the minimum number of shots unless specified otherwise. The burst fire chart is located beneath the cause grid in the upper results.
The number to the left, within the burst icon, is the burst value, which indicates the number of projectiles fired. The number to the right is the number of actual hits (or successes) scored. The difference between the burst value and the number of hits is called stray shots (used with optional unintended targets rules). Each hit after the first in a given location increases the row on the effect grid by 1 (so (3)d6 becomes (4)d6). Alternatively, if bumps are used, each additional hit after the first adds one conditional "damage only" bump.
See the action card appendix for more on burst fire results.
Hitting Multiple Targets
The rules for hitting multiple targets with burst fire are not ready for prime time, so no examples will be covered in card usage until they are.
Spreading Hits Across Multiple Locations
As with hitting multiple targets, rules for this are not yet ready. This may or may not be a thing.
Combat Example, Chuk vs Klackons, continued
Holding his ground, Chuk unleashes a withering hail of blast fire into the approaching klackons. A blast MMG can only fire in full auto mode, so it uses the 10 burst section. How many projectiles find home?
Wow, 8 rounds plow into the lead klackon.
Hit Location
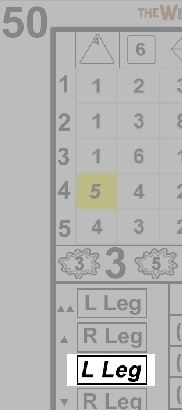
To the left of the effect grid is a set of four rectangles. Each of these contain a hit location.
The second rectangle from the bottom is italicized and bold. This is the standard hit location. The other hit locations are used with the optional bump rules (see below) as well as with positional adjustments such as advantages of high ground. Consult the conflict chapter for more on hit locations.
Next to all the rectangles except the standard hit location is either 1 or 2 triangle arrows. These arrows represent both direction and cost. Each triangle is one bump to change to that location, and the direction is either up or down. The hit location bank is a stack of rectangles, and the results are arranged to generally move up the body (toward the head) as you move up in the stack. When results are within the same location, thematically it can be assumed that higher in the stack is a higher spot within the location. Sometimes results will go from side to side, such as right to left arm or leg. In this case, even though they are arranged on top of one another, the location change is horizontal.
Your Crew can interpret the results horizontally and vertically however they wish. These thematic options are suggestions, only, intended to help visualize the action.
Combat Example, Chuk vs Klackons, continued
Consulting the hit location section of the card, Chuk determines that his rounds hit the left leg.
Armor Penetration/Ablation
Successfully placing ordinance on a target is one thing, penetrating the protection of said target is another. Each weapon has a penetration value and type, as well as tech level. Armor has protection values versus multiple attack types, as well as a tech level. Most natural armors, such as the shell of a turtle, have an effective tech level as well even though they are not technological per se. Many spacefaring creatures have natural armor that has no tech level, these creatures ignore the tech level of all weapons.
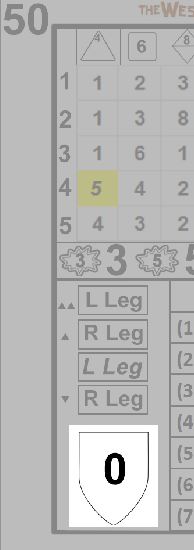
Each action card has a shield icon to the left of the effect grid. Inside the shield is a number from -2 to +2. This number is applied to the penetration value of the attack before comparing it to the protection value of the armor. The resulting number is known as the Effective Penetration (EP).
If the EP is 2 or more greater than the protection value of the armor, the attack penetrates. If the EP is equal to or one greater, the attack ablates. If the EP is less than the protection value, the attack deflects.
Attacks that penetrate do full damage. Attacks that ablate do reduced damage. In both cases, the protection value is decremented. Attacks that deflect do no damage and the protection value is unaffected.
Tech Level and Armor Penetration/Ablation
Tech level has some effect on this, but it is as yet undetermined.
Burst Fire and Armor Penetration/Ablation
This also might have some effect, but it is also as yet undetermined.
Combat Example, Chuk vs Klackons, continued
Now for the moment of truth. Can the charging klackons withstand the destruction wrought by Chuk and his blast MMG? Blast MMGs are TL 8, Penetration 8, and are energy weapons. Klackons have natural armor (no tech level), protection 6 in chest/belly, 5 everywhere else versus energy. For this attack, the klackon has 5 armor.
The blast MMG penetrates the left leg, dealing full damage: (4)d10. The protection value for this klackon is reduced to 4 in his right leg.
Dealing Damage
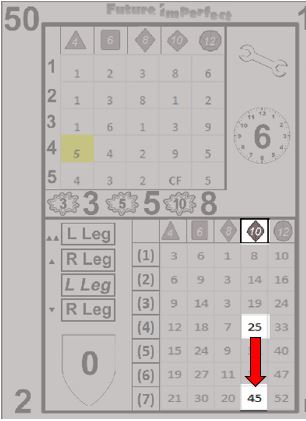
Damage is applied exactly as described in complex tasks. The only difference between collecting victories and assigning wounds is that any leftover effect magnitude is applied as concussion. See the Conflict chapter for more on dealing damage.
Combat Example, Chuk vs Klackons, continued
The blast MMG penetrated the leg armor of the klackon, dealing (4)d10. Because 8 shots hit, the damage value is increased by 7 (one for each shot after the first). There are only 7 rows in the effect grid, so any leftover bonus after the 7th row is added directly to the magnitude. This makes the effect result (7)d10+4. The magnitude is 49 (45 +4).
The shot deals 5 wounds and 19 concussion. Normally, this amount of damage would deal 8 wounds before converting to concussion. However, no limb can take more than 5 wounds before being destroyed/severed. The klackon loses the leg, must make a concussion save, and a death save. See the Conflict chapter for rules on how to do this.
Ancillary Effects
Once all hits are applied, the next step is determining if any other effects occur. There are two possible ancillary effects: equipment failure and unintended targets. Equipment failure is represented by a wrench icon located just above the scatter clock face.
If a broken wrench with a number superimposed on it is present, that number is compared to the reliability of the equipment to determine if a breakage occurs (equipment fails when the result over the wrench is below the equipment reliability). If an intact wrench appears, this section can be ignored. See the gear chapter for more information on equipment reliability.
The second possible ancillary effect is unintended targets. Before any ranged shot is attempted, the Master may inform the player of potential unintended targets (in the case of other PCs or important NPCs or terrain features, the Master should inform the player before the shot is attempted). Generally, unintended targets are within one meter of the firing path of the weapon. Unintended targets may be living or otherwise, such as windows, breakable objects, etc. See the Conflict chapter for more on determining potential unintended targets.
Compare the number of stray shots to the numbers superimposed over the figure icons. If the number of stray shots is equal to or greater than any of these numbers, an unintended target is hit. Note that multiple unintended targets can be hit in a single shot if multiple targets are indicated.
In most circumstances the closest or most obvious unintended target is hit first. Unintended targets can be used to increase immersion and drama during scenes. Missed shots have to go somewhere. The Master has final determination of which unintended targets are hit, however it is suggested that players be made aware of possible unintended targets before attempting a shot.
See the Conflict chapter for more on unintended targets. The action card appendix discusses how unintended targets are determined, as well as an alternate method for using the unintended target track.
Combat Example, Chuk vs Klackons, conclusion
Now that the damage has been dealt, the remaining possible effects must be determined, if any. First, check for equipment failure.
Since an intact wrench is present, there is no possibility of equipment failure.
Finally, unintended targets. Since the burst size was 10, and 8 shots hit, the number of stray shots is 2. Given that the hallway is empty except for the two charging klackons, there is only one possible unintended target.
Since there are two stray shots, and the icon has a 3, no unintended targets are struck. Had there been one more stray shot, the other klackon would have been hit.
Shuffling
The action card deck should be shuffled before any action scene. Also, if at any time a card is drawn that has SHUFFLE written across the left edge, complete the current resolution, and then, before proceeding, combine the deck and discard pile and reshuffle the deck.
Optional Results: Bumps
Heroes perform actions with style and pizzazz. Sometimes, this means they succeed when others might fail. Sometimes they do things that seem impossible. Sometimes they just add an extra helping of cool to the performance. Bumps can help facilitate this at the table.
Whenever a task is attempted, the Master will provide a TN for success. If the result generated exceeds the TN by 4 or more, a bump has been achieved. For each full multiple of 4 above the TN one bump is awarded. For a TN 5 task, bumps would occur on 9, 13, 17, etc.
Using Bumps
For each bump the player may invoke any of a number of possible choices. Bumps may be used to change hit location. They can increase penetration value (or cause increased ablation). They can add damage. They can grant the player a minor action to perform along with the current action. Bumps do not persist, so use 'em when you get 'em. Players can freely choose how to use their bumps, but the Master has final say over any added minor action or anything not explicitly defined on the action card.
While the options are many, using bumps in play is quite simple. One advantage action cards have over dice is that by visually having the options present on the card, it serves as a reminder of what is possible. This leads to fewer instances of special abilities being forgotten or neglected in the crunch time of action.
Bumping Hit Location
If you recall, the hit location bank includes 4 possible hit locations. By using 1 bump, the hit location may be moved up or down one spot in the hit location bank. For example, see the following diagram:
The card pictured (50) shows a standard hit location of left leg. Bumping up or down has the same effect, in this case (changing legs), and, if two bumps were available, the hit location would revert back to the left leg.
Another example, this time using card 16 illustrates a much more advantageous usage of location bumping.
In this case, the standard hit location is belly, but with a single bump the location can be changed to either the right arm or vitals.
In all cases, the triangles (up or down) denote the number of bumps necessary to select the alternate location, and the direction of the apex indicates the general direction of the location change.
Bumping Penetration
Each weapon in Future Imperfect has a penetration value. This value is used to both penetrate and damage armor. Skilled combatants are consistently able to find weak points in enemy defenses, and bumping penetration simulates this.
Bumping penetration is simple. The penetration modifier, shown in the shield, may be increased by one for each bump spent. This cannot be used to increase the penetration modifier above +2. Any increase above +2 is two bumps per increase.
The card shown here has a 0 penetration modifier. To increase it to +1 would cost 1 bump, and to +2 would cost 2. Increasing it to +3, however, would cost 4 bumps.
Bumps may also be used to increase ablation. One bump may be spent to reduce the armor value by one additional point. Alternatively, it may instead ablate the armor value at a secondary location instead (this does not cause a wound there, or move the current hit to that location).
Bumping Damage or Effect Magnitude
Bumping damage is the most straight-forward bump spend. For each two bumps spent, increase the row value of the effect by one. Effect cannot be bumped below row (7). Bumping effect magnitude (for generating victories) works in exactly the same way. Bumping damage or effect magnitude is limited only by the row 7 rule, above.
Minor Actions
Adding a minor action to the just resolved action is also feasible. This type of bump spend is subject to Master approval. Some examples of minor actions that can be added include swapping out a magazine, ducking behind cover, pointing out a scene detail to your comrades, jumping onto a chair, or anything else that increases the drama and story in the space of a second or two.
Bumping Stray Shots
Bumps might potentially be used to increase the number of shots in a burst that hit, and may also be used to bump between unintended targets. Rules as yet to come.
Initiative
One section of the action cards that has been mentioned, but not discussed, is initiative. The initiative key and bar are located on the left side of the card. Unlike many of the entries previously discussed on this page, the initiative section requires a full rules explanation to fully understand the usage. Therefore, the initiative chapter is integrated with an action card based tutorial: Future_Imperfect_-_Initiative_and_Action_Speeds
Card Deck
A set of the cards is available in jpg format here: https://www.dropbox.com/s/cao1a1la2euq43h/5.3.zip?dl=0
