Action Cards - Deprecated
This game comes with a set of action cards, capable of resolving actions from simple to complex in seconds. At first glance, all of the entries may seem daunting, but only a subset of the information will be used in each draw. The fundamental rule of action cards is: One action, one card*. This means that no matter how complex the action, everything you need can be found on a single card.
Action cards derive greater value the more complex a task is. Using action cards for a simple skill check takes a couple of seconds, just like a dice roll. But using action cards to resolve a combat situation involving hit, damage, armor, hit location and possible weapon breakage (and other rare situations) also only takes a few seconds, while doing it with die rolls takes significantly longer. Another advantage it offers is that the rarely used rules, like equipment failure and unintended targets, are automatically checked with no extra effort, and stand out when relevant.
It is the intent of the designers that the game be played using action cards. However, play the game you want! Rules for using dice instead are provided at the end of the rulebook.
*There are rare cases when subsequent draws can occur, but they are not mandatory. These additional draws do not increase the complexity of the action, only the magnitude of the result.
Contents
Card Anatomy
Action cards are divided into three sections: upper results, lower results and outer edge. Upper results are often referred to as causes, lower results are effects. For example, determining whether a skill is used successfully is an upper result: a cause. Determining the damage a handgun deals to an opponent is a lower result: an effect.
Cards have a unique identifying number in the upper left hand corner. Anytime a card is referred to in the rulebook this number will be included in the paragraph.
Binary Skill Check
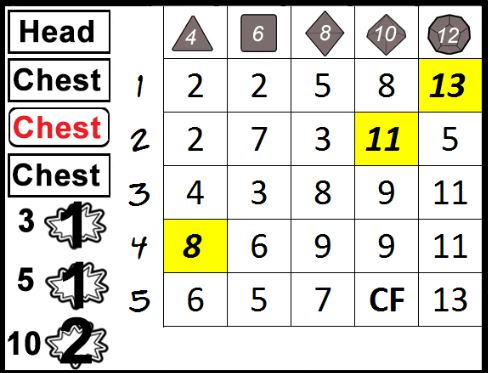
This is the simplest type of action, yet it is also very common. Some examples of binary skill checks are: Can I climb this tree in time? Can I pick this lock? Can I jump across this chasm? Any check that returns a pass/fail result is a binary skill check. Binary skill checks exclusively use the upper results section of the card, pictured here.
To resolve a binary skill check, find the appropriate die type column and cross-reference the number of dice in the pool. The result is any entry in the given square or higher in the appropriate row. In effect, each square is one die. In this example card, 3d8 could choose 5, 3 or 8.
Example: Sid Scorpio is attempting to outrun a Kyr commando on (some planet) and he comes to a deep crevice in the rock, with a 50 meter fall to a craggy doom below. He knows his only chance is to jump, so he declares his intention. The card is drawn and compared to his attribute of 3d8. In the d8 column the results are 5, 3 and 8. He chooses 8 and compares it to the TN of 7. A success.
That is it! In a simple task like this, nothing else on the card is relevant.
Skill Check With Degrees of Success
More complicated skill checks often involve both a pass/fail element as well as a magnitude of success. They could be instant results like in combat, or extended tasks like decoding a cryptogram or hastily constructing shelter before the storm arrives. Some examples are: I hit, but how much damage? I made my computer roll, how much programming do I get done?
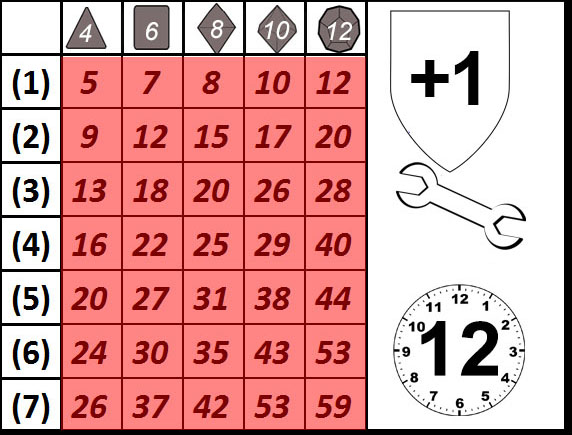
To resolve a skill check with degrees of success, follow the procedure above to determine if the attempt is successful. If it is, find the appropriate row and column pair on the lower results, pictured here. Note that in this section, lower rows are always better than higher ones (these results are sums of the given number of dice). The number generated is compared to the complexity of the task (or size of target, if combat). Each multiple of the complexity achieves 1 success. Extra effect is lost.
Combat is a special case. Instead of complexity, each target has a size value. Compare the effect points to this number. Any additional effect is dealt as concussion.
Example: Xenes wishes to bypass a complex security system while trying to escape from a band of pipe wielding thugs. He has a narrow lead, so time is of the essence. The TN of the security system is 5, and the complexity is 6. The Master determines that he needs 3 successes to achieve his goal. He draws a card and checks his Security Systems skill of 4d8, yielding a 9. This is a success!
Now to determine how many successes he achieves. He consults his tools and notes their quality is 5d6. Checking the appropriate box he finds 27, granting him 4 successes at complexity 6. The extra 3 points are lost. However, since he achieved more than the required number of successes, Xenes is able to defeat the security system in one action.
Combat Action
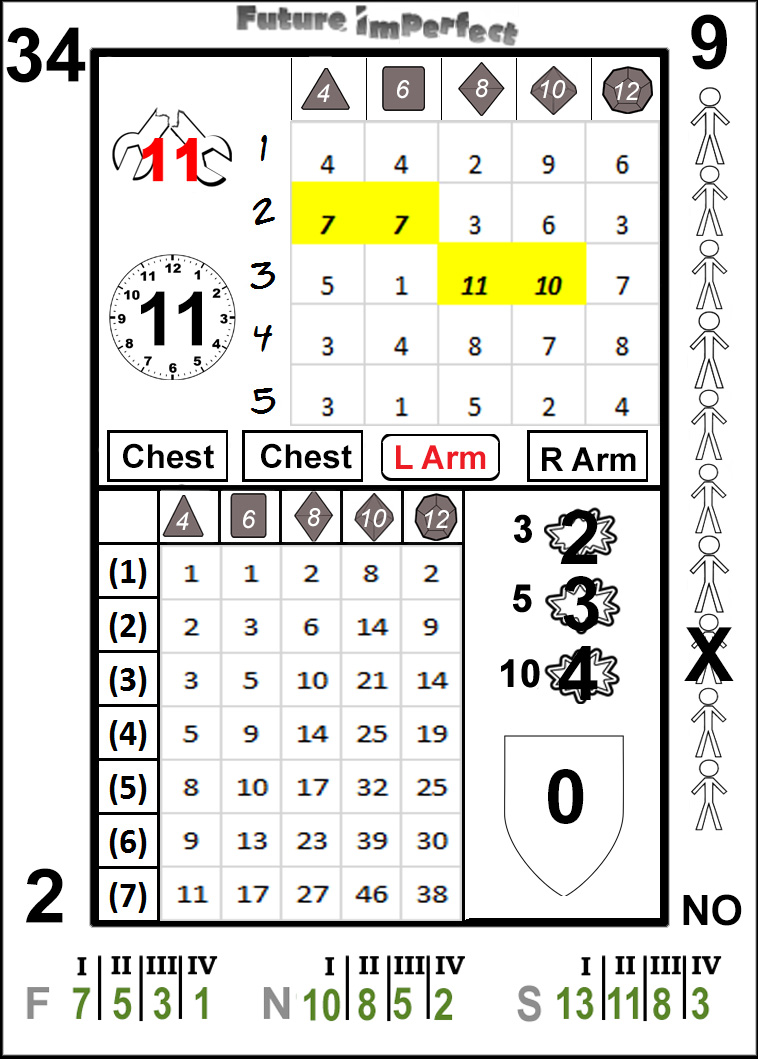
As in most games, combat in Future Imperfect can involve many complex actions and interactions. What follows is a step by step usage of an action card to resolve a complex combat action. All of the following examples refer to this card (number 34):
Example 1: Xenes Versus Thugs
After defeating the security system, Xenes enters the secured hallway and moves down the corridor to a supply room, where he finds an unattended blast carbine. Hearing the thugs enter the door behind him, he turns over a table and takes up position behind it. He will be ready when the thugs barge in.
In the first round, Xenes gets the drop on them and makes his attack. The thugs are not surprised, but they are in the open. The standard TN for a shot is 5, and he decides to fire a burst of 3. He has 4d8 in rifle, so he checks the d8 column and finds 3, 3, 2, 7.
His result is 7, a hit. Because he declared a 3 round burst, the 3 section in the lower left of the upper results indicates how many rounds hit.
In this case, it is 2.
The next step is hit location. The four rectangles to the left of the upper results are the possible hit locations.
Unless told otherwise, use the bold, red result in the box with rounded corners. This is the standard hit location. In this case, it is the left arm.
The thugs are well prepared for a fight, each clad in LBA3. Can the blast carbine penetrate? Here is how you find out. The carbine has a penetration value of 6, and the armor has a protection value of 4. Add the number in the shield near the lower results to the penetration value of the weapon.
In this case it is zero. Because the carbine has a higher penetration value* than the armor has protection, the shot penetrates for full damage*.
Next we calculate damage. A blast carbine has a damage value of 3d8.
In this case, it does 13 points. Compare that to the size of the thug, 6, and 2 wounds are dealt. In combat extra effect carries over to concussion damage. The thug takes 2 wounds and 1 concussion from this shot.
The second shot is calculated in exactly the same way, except it uses the hit location in the box directly above the standard, in this case, chest. The thug has taken a total of 4 wounds and 2 concussion. He is in serious shape!
Finally, beneath the shield in the lower results is an icon of a broken wrench.
This is the equipment failure section. The wrench will only be broken if there is a chance for breakage. In this case, there is a number, 11. This is compared to the reliability of the blast rifle which is x. The blast rifle fails, the Master rules it has overheated. This occurs after the shot.
*Penetration has some advanced rules that are discussed in the equipment section. This example is simplified for illustration purposes.
Example 2: Kyr Commando Versus Sid Scorpio
The Kyr commando sees that Sid has made his leap across the chasm. He fears that in a few seconds Sid will disappear into the woods, and with his skills he might escape for good. The commando has no gun, but he does have a concussion grenade.
The commando has a grenade skill of 4d6. At this range the TN is 7, a tough shot.
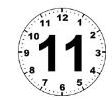
He checks the d6 column and finds 6, 1, 1, and 6. A miss. With area effect weapons, close just might be good enough. Check the clock face in the bottom right of the lower results.
The 11 shows the direction of the scatter. Orient the clock as if 12 were directly through the target, and 6 is directly toward the attacker. With scatter the outer results must be consulted. In this case, because it was a thrown weapon (not launched) the lower left number is used. The shot misses in the given direction, and the distance is this number times the difference between the TN and the result. The commando missed by 1, and the lower left number is 2. The grenade lands 2 meters from Sid. That is within the blast radius of 3. Looks like Sid might be in some deep trouble!
Concussion grenades do not take hit locations. They also deal all of their damage as concussion. The grenade is 3d6, in this case 11.
This is directly subtracted from the CT of the target. Sid only has 3 CT remaining. He also must make a concussion save.
Advanced and Optional Rules
In Future Imperfect, most die rolls are open ended. This means if the highest number is rolled on the die, it may "explode", adding another roll to the result. The results in both columns handle this without any additional rules. You may have noticed that there are results in some columns that exceed the given die maximum. You may also have noticed that some upper results are bold and italicized, as well as highlighted.
These results are exceptional successes. For example, in the d12 column, the 1 result is an exceptional success. If additional success is applicable, for bumps (see below) or other reasons, another card is drawn and added to the current card. In this case, only the number that directly corresponds to the exceptional success box can be used. To continue the previous example, when a second card is drawn, the only number that can be added to the 13 is the 1d12 number on the new card, even if the full dice pool is 4d12.
Why is this the case? Consider each discrete box as a die being rolled. When one die explodes, that die is re-rolled, while the other dice are left as they are. Each column is a set of dice, with 1d12 being the first die, 2d12 being the second die, etc. Since each box is a single die, to add another die to the result, the only value that is relevant is the result that corresponds with the die that was rolled.
The same is true for the lower results section. In this case, the font is bold and italicized, and the box is shaded red.
Unintended Targets
On the right outer edge are ten figures, and some number of them have black X through them.
This is the unintended targets section. This section is used when any round misses the target. This means that burst fire may hit multiple unintended targets. Any valid target that is within 1 meter of the path of the projectile may be hit. At the discretion of the Master targets that are more than 1 meter beyond the target, but less than 1 meter to the left or right may be hit (as long as it is within range of the weapon).
Before the shot is attempted the Master should inform the player of all potential unintended targets. If at least 1 round misses, count the figures from the top to the first x (including the one covered). If there are at least that many potential targets, one is hit. To determine which target is hit, order them by distance from the attacker, with the top figure representing the closest. In the image above, an unintended target may only be hit if there are at least 8 potential targets, and the one hit is the 8th in distance from the attacker.
Firing into a crowd is risky! Use of the unintended targets mechanic is optional.
Critical Failures
If the result in the table is a CF, the result is a critical failure. All other results are ignored. Note that this only occurs if the exact number/die type result has the CF. In the number 34 card above, 4d12 would be a critical failure, while 5d12 would not. CF is treated as a zero for all other purposes. Each row/column pair has a single CF in the deck.
Bumps
For every 4 the target number is exceeded by in a cause result one bump is generated. Bumps can be spent to improve effect results, change hit locations or other possibilities depending on the situation. Some types or quality of equipment grant special bump effects. See the bump section of the task resolution chapter for more information.
Using bumps is optional.


