The West That Wasnt - Conflict - AP v2
You have a Hero, and you know what the numbers mean and how the cards function. Now it is time to begin bringing the narrative to life. A good story is never easy. The protagonist finds obstacles at every turn. Overcoming these obstacles forms the basis of both the Hero and the story. Whenever a Hero is at odds with some element of The West, there is conflict. When that conflict escalates into the physical, the Judge breaks the game down into rounds. This may also be referred to as "action time".
Contents
[hide]- 1 Action Time
- 2 Movement
- 3 Combat Actions
- 3.1 Ranged Combat
- 3.2 Range
- 3.3 Modifiers
- 3.4 Target Size
- 3.5 Target Speed
- 3.6 Throwing Things
- 3.7 Aim and Snap Shots
- 3.8 Tactical Aiming
- 3.9 Fan Firing
- 3.10 Two Weapons
- 3.11 Two handed ranged weapons
- 3.12 Hand to Hand Combat
- 3.13 Multiple Attacks
- 4 Applying Damage and Wound Effects
- 5 Action Cards in Combat
- 6 Dealing Damage
Action Time
When the Judge declares action time, the sequence of game play becomes more structured. Each round is divided into 20 segments. During each segment up to 1 AP may be spent toward an action a character wishes to perform. Once spent, APs are lost, even if the action never resolves.
During each round each character has a number of action tokens equal to their AP to spend. Tokens are spent by removing them from the track during the segment when they are spent. Spent tokens are placed in the spent box on the character sheet. Tokens may not be saved from round to round.
Initiative
Each combat round begins with an initiative step. During this step all characters perform an initiative test, and then adjust their action track.
The Initiative Track
On the back of the character sheet is the Action Track, which lists the segments (1-20). This track is used to order actions during the turn, and track spent APs.
The Initiative Test
The initiative test is an Easy (3) Quickness test. If the test is successful, place an action token on the action track at the Initiative Number (IN) of the character. For each bump, shift the token one slot to the left. If the test is failed, place the token one slot to the right. If the result is a calamity, shift the token a number of slots equal to the Step, plus one, to the right.
Example
Action Timing
During Action Time, actions cost AP and resolve when the appropriate costs are paid. During each round the Judge counts off the segments in the phase, beginning with 1. When the Judge calls a segment that is equal to or greater than the IN of a character, that player places a counter in front of them on the action track. After all players eligible to place a counter have done so, players may declare actions for their character. Any action a character wishes to perform must be paid by removing their counters from the action track, and the counters removed must be equal to or greater than the number of AP the action costs. If there are not enough chips present, the action may not be declared (and the counters are not removed). Actions are declared in ascending order of Quickness but are performed based on simultaneous action, below.
Miranda Valentine has an IN of 4. When the Judge calls 4, she places a counter on the action track. She then announces that she is drawing her Peacemaker, which takes 1 AP. She removes the counter from the action track. When the Judge calls 5, she places another counter on the track and declares that she is cocking the Peacemaker, which takes 1 AP. She removes the counter and the action resolves. When the Judge calls 6, she places a counter on the track. When the Judge calls 7, she places another counter on the track. When the Judge calls 8, she places another counter and declares that she is taking a normal shot at Felicia Laroq, which takes 3 AP. She removes three counters and the action resolves.
If a character wishes to resolve an action that costs fewer AP than counters they currently have in front of them they still must remove all of their counters.
Simultaneous Actions
When multiple actions occur on the same segment they are essentially simultaneous. Each action that will occur goes onto the initiative stack (below). Additionally, any character may pay for an action using counters from the track and place it onto the stack (all excess AP are lost). Placing an action onto the stack in this manner costs 1 AP from the pool. If a character does not have an AP to pay to place their action onto the stack, they may pay it from their next round AP.
Ending the Round
After the conclusion of the 20th segment, or when the last character has spent their last AP (whichever comes first), the round ends. Proceed to the initiative step of the next round. If one or more characters have APs spent toward an action, and enough APs to perform that action, those characters may perform those actions as if there were segments beyond 20 at the conclusion of the 20th segment. No further actions may be declared, however, after those actions are resolved even if characters have remaining APs. Any unused APs are lost.
Example
Rushing Actions
Sometimes, right now just isnt soon enough. If a character is willing to sacrifice some precision, well, then they can get them self a little more speed. Once all actions are declared for a segment, any character may declare they are attempting to rush their action. There are two potential effects to rushing actions: moving an action into a sooner segment and/or moving the action up higher into the initiative stack.
To rush an action, a character must have at least 1 AP in front of them on the action track as well as enough AP left in their pool to fully pay for the action. First, declare the intention to rush the action and spend the appropriate AP from the action track and available pool. The AP spent from the pool (not from the track) is the amount the action is rushed. Next, declare all targets and other necessary information required by the action. The character is now considered to be in the initiative stack. When the action resolves the character will pay Rush Tax based on the Step number of the card drawn to resolve the action. If the action does not normally require a card to resolve, draw a card and consult the Step to determine the tax.
Stipulations:
1. Aiming cannot be rushed. Therefore, any shot that is taken after a rush is always a snap shot (except in 3, below).
2. Any penalty AP that are paid (Rush Tax) may be paid from next rounds AP once the current pool is exhausted.
3. Actions that are fully paid can be rushed for no Rush Tax. For example, a character using a Henry rifle who has paid 6 AP toward an aimed shot may perform a normal shot (5 AP cost). If they were in the midst of a second aim action (8 or more AP paid), however, they could keep the first aim (because it is fully completed and not being rushed) and lose the second. As usual, in both cases all AP are still used.
4. No action may be rushed by more than half of its AP cost, rounded down.
THE PREVIOUS SYSTEM IS PROBABLY UNNECESSARY. I am going to leave it here so we can potentially test it just in case, but in general, we already have 'rushed' versions of common actions. This is what a snap shot is, for example. We can still add the Quick Draw skill for manipulating the Initiative Stack, below.
The Initiative Stack
If more than one action is set to resolve on the same segment, the initiative stack determines the order. Each character determines their bonus and once all are declared, all cards are flipped. The bonuses are added to the Fragment and actions are resolved in descending order on the current card. In other words, a characters card will determine the order in the stack they will perform their action, as well as the effects of that action.
Determine Bonus
Once all actions that will occur during a segment are known each character has an opportunity to improve their chances of going first. Order is determined using the Fragment of the resolution card modified by the following factors:
1. Any bonuses or penalties from gear.
2. Any bonuses or penalties from wounds or environmental effects.
3. Bonuses from the Quick Draw skill.
4. Each AP spent from the pool grants the character +1. AP lost due to over spending is not in the pool and cannot be used for this purpose. No character may spend more AP for bonus than their level in Quick Draw.
During the determine bonus phase each player with Quick Draw may attempt to use it to add to their bonus. To do so resolve a TN 5 Quick Draw check. For each success and bump add +1 to the bonus pool. This is attempted before spending AP to add to the pool. On a Calamity no AP may be spent, and the Quick Draw provides no bonus.
Once all characters declare their bonus cards are flipped, and actions are resolved in descending order of Fragment plus bonus. Any ties are broken by the Number on the card.
Movement
Characters may pay AP to move during their action. Characters may move a number of paces equal to their Move characteristic for 1 AP. A character may instead move a number of paces equal to their Run characteristic for 1 AP. Characters who use their Run characteristic are considered to have run for the entire round.
Resolving Movement
A character resolves their movement by spending the appropriate APs and moving their figure on the tactical map. Scale movement is in inches or hexes on the battle map, or paces in the world of the west. One pace is approximately equal to one meter or yard.
Movement AP Cost
The following are AP costs for movement. Characters may change facing up to 60 degrees (one hexside) per pace of movement for free.
Drop prone: 1 AP
Stand up: 2 AP
Maneuver: 1 AP Move value
Maneuver: 1 AP Run value
Maneuver up steep grade: +1 AP per pace
Maneuver up gentle grade: +1 AP per 2 paces
Climb ladder: +1 AP per pace
Climb stairs: +1 AP per 2 paces
Climb wall/cliff face: +2 AP per pace
Duck behind cover: 1 AP
Emerge from cover: 1 AP
Change facing 60 degrees without moving: 1 AP
Change facing more than 60 degrees without moving: 2 AP
Change facing 120 degrees during a move: 1 AP
Continuous Action Movement
Mounts and vehicles perform a special kind of movement called a continuous action. Continuous actions take place throughout the turn, rather than in a single batch. Each character or object which is taking a continuous action moves a portion of their movement during each segment. The character need not pay AP for the movement taken by the mount or vehicle, but may need to pay AP for maneuvers or other changes in the movement of the mount or vehicle.
To perform a continuous movement, divide the total movement into equal (or roughly equal) parts and spread them between the 20 segments. The movement during the slowest segment must be within one pace of that in the fastest. Continuous action movement occurs before other actions, and proceeds from slowest to fastest, based on Quickness value.
Skills During Action Time
Many skills can be performed during action time. The cost to perform a skill is 4/8 AP, depending on the complexity of the skill and attempt. Consult the Judge for how many AP a particular skill will take. Generally, something that requires the full attention of a character, such as reading a map or picking a lock requires 8 AP, otherwise the skill costs 4. The AP to perform a skill check may be paid over multiple turns (if it makes sense, such as with the lockpicking attempt, but not for an ongoing skill, such as sneak), however the attempt is not resolved until the final AP is paid. Use a counter to track how many APs have been spent toward any skills being attempted.
Combining Combat and Non-Combat Actions
It is possible to do both combat and non-combat actions during the same action. Combining combat and non-combat actions works the same as firing multiple shots or doing two actions in a round. One action is declared to be primary, and the other is secondary. The primary action uses the highest die in the appropriate pool, while the secondary uses the second highest. If both actions use the same pool, this is relatively simple. Simply resolve the first action using the highest die as normal and then resolve the second action as if the second highest die were the highest.
If they use different pools, then resolve the primary action as normal using the appropriate pool. Then consult the appropriate pool for the secondary action and choose the second highest die and resolve it as if it were the highest.
In either case, if multiple extraordinary results exist in either dice pool, fully determine their magnitudes before choosing which to resolve.
EXAMPLE
Because of the granularity of the AP system performing simultaneous actions is extremely rare, but this system exists to smoothy handle those edge cases.
Combat Actions
Now that we know when characters will go, what exactly will they do? What follows is a description of how to moderate the turn.
Ranged Combat
A ranged attack is a Coordination (sometimes Acuity) check with modifiers based on the situation. Some common modifiers are range, target size, movement and other distractions. Those potential modifiers are discussed below.
Range
The Target Number required is Standard (5) plus any relevant modifiers. Add one to the TN for each full range increment between the firer and target. See the gear section for any applicable range increments or other vital details regarding weaponry.
Cyril Wellington wishes to plug a villain with a shot from his .44 Schofield. The range increment for this weapon is 10. The TN to hit the villain up to 9 paces away is 5, up to 19 it is 6, etc.
Point Blank
Point-blank range is used when one character is holding a weapon in contact with another character, using them like a shield, holding them hostage, or shooting over a table where they both sit. In general, the weapon should be close enough to touch the target with arms extended. The TN for point blank range is 3.
Modifiers
The previous paragraphs describe what is known as the base TN, other modifiers may also be relevant to your check. A firefight is a chaotic and unpredictable environment. The Judge will provide any modifiers which are appropriate before any cards are drawn. Some common modifiers are listed below.
| Situation | Modifier | |
| Firer is moving | -1/-4 (walk/run) | |
| Firer is mounted | -2 | |
| Firer is wounded | Varies (See Stun section, below) | |
| Size | Varies | |
| Target is moving | -1 per 5 paces relative speed | |
| Secondary targets | -1 for each target after the first, cumulative | |
| Appearing/Disappearing* | -1 | |
| Target is prone | +1 |
*If a target is emerging from or entering cover or visibility (from the firers perspective) during its movement this penalty is applied.
Move and Fire
If the character is moving one or two downgrades are applied, depending on the speed.
Mounted characters are a special case. The modifier listed is used only if it is worse than the movement penalty applied from firer movement.
Target Size
If the target has a size 4 or less, add 1 to the TN required to hit, if it is 2 or less, add 2. For larger targets, add +1 to the result for every +2 size the object/creature has above 6.
Target Speed
Of course, it's harder to hit a moving target than one that's standing still. A penalty of one is applied for each 5 paces of relative speed between the firer and target. "Relative" means you need to take into account how fast the target and the shooter are moving in relation to each other.
Miranda is chasing a bandit down Main. She has a Move of 8, he has a Move of 8. The relative speed is 0, meaning the penalty is 0.
Hank is driving his wagon east down Legless Gulch, with Cyril in the back riding shotgun. Cyril spies an ornery vaquero heading west down the mountain trail, leading into the gulch. He knows when the hombre gets into the gulch, he will hightail it and be right behind them in a jiffy, so he wants to take a shot with his shotgun as soon as possible. Hank is pushing his nags to 18 paces Speed, while the vaquero is going only 8 paces Speed down the rocky trail. Since they are going opposite directions, the relative speed is 26, for -5 to the result.
Not all groups prefer the idea of relative movement. If you prefer to use total movement instead of relative movement, check with the Judge and be consistent. Play the game you want to play!
Throwing Things
The throwing skill works just like shooting for most weapons. The Range Increment for all thrown weapons is 10 paces. The maximum range a character can throw an average size weapon (1-2 pounds) is NEEDS WORK.
When a thrown item misses the intended target, use the scatter section of the Action Card to determine where the item lands. Orient the clock face with the 6 in the direction of the thrower and place the thrown object a number of paces equal to the phase result (bottom left) from the target in the direction displayed within the clock face.
Aim and Snap Shots
There are three types of shots that may be attempted: Snap shot, normal shot, aimed shot. A snap shot is the fastest, followed by normal then aimed. Each ranged weapon has an AP cost listed for snap and normal shots. There is also a value for aim, which is the AP cost of an aim action. Weapons also have cock and SP (snapshot penalty) values.
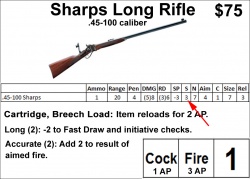
Consulting the weapon card for a Sharps rifle, above, the weapon may be fired as a snap shot for 3 AP. This shot would take a penalty of -3 (the SP).
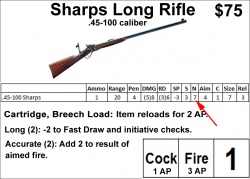
Again consulting the Sharps weapon card, a normal shot can be fired for 7 AP. This shot would not take a snap shot penalty.
Weapons may be aimed, if desired. Aimed shots are any shots which take aim actions after paying the AP cost for a normal shot. Each successive aim action adds +1 to the result. Up to two successive aim actions may be performed in this manner. Only normal shots may be aimed.
Some weapons have an attribute called Accurate, which is followed by a number in parentheses. If aimed, that number is added to the result before comparing to the TN.
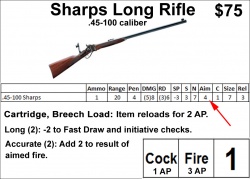
Finally, we can see that to make an aimed shot with the Sharps would require 11 AP. That shot would be +1 (for the initial aim action) and +2 (for the accurate attribute), for a total of +3.
Cyril Wellington is hidden across the street behind a vaquero who is holding Miranda at bay. He knows he only has one shot in his Schofield, so he needs to make it count. He decides to spend 3 AP for a normal shot, then 4 more AP to aim twice, granting himself a total bonus of 2 on his shot, and costing 7 AP.
Aim does not persist from shot to shot. Any firing action also nullifies the aim.
Optional rule: When making an aimed shot, the character may choose to use either their Coordination or Acuity trait. This could vary from shot to shot, if the situation warranted.
Cocking and Readying
Weapons need to be ready to be used. Most firearms in TWTW require cocking before they can be fired (except for hammerless shotguns and double action revolvers). An item (such as a saber) need only be readied once, while firearms must be cocked before each shot.
A weapon is considered ready when it is in hand and free from any encumbrances such as holsters or scabbards. Weapons of up to size 5 cost 2 AP to ready. Larger weapons cost 1 extra AP for each unit of size above 5.
Cyril Wellington carries a S&W Schofield (size 5) and a Winchester rifle (size 8). It costs 2 AP to ready the Schofield, or 5 AP to ready the rifle.
Cocking a weapon is a simple action, costing 1 AP for most. The cost to cock a weapon is in the C column of the weapon card. Cocking must be done before any aiming.
Double action revolvers are a bit of a special case. In the real west, double action revolvers were not as popular because of their heavier trigger pull which affected both accuracy and speed. These weapons have the appropriate attributes to reflect this on their weapon cards. But double action revolvers can also be cocked, like single action revolvers. During game play, if a character wishes to cock a double action revolver, it loses all negative double action traits and replaces them with the single action trait (wins initiative-based ties) for that shot.
Carrying Loaded Weapons
Most inhabitants of the West carry their firearms loaded, but in the case of pistols, they generally carry only 5 loaded chambers instead of 6. The reason is simple: safety. Firearms of the day could fire if jostled when a bullet is present under the hammer.
If a character chooses to carry a fully loaded firearm, the following rules apply. A Calamity result on an action involving any kind of movement leads to discharge of a round. The same is true for any malfunction result that is within the malfunction range of the weapon. Check the toggle result on the Action Card. A YES value means the shot misses the character, a NO means it did not. Apply a hit to the closest body part (usually the leg, depending on how the weapon is stowed).
Tactical Aiming
Aiming on a range or in a pasture is simple; aiming while .45 caliber slugs whiz past your ears is another thing entirely. In TWTW, normal or aimed shots may require a bravery check if the character is under fire. Consult the following to determine effects.
1. Determine if the character may lose aim. A character may lose aim if they are targeted since their aim began, or since their last action.
2. If the character was the target of a ranged attack, pay the AP for the shot and then perform a Standard (5) Bravery check. Subtract 1 from the result for each shot after the first that targets the character, and 2 for each attack that hit the character. If the check succeeds, perform the shot as normal. If the check fails, the AP are spent, but all previous aim is lost and any shot is a snap shot. Aiming may not be attempted again this round. They may choose to make the snap shot or forgo making a shot.
3. If the character is a target of a melee attack, perform a Difficult (7) Bravery check. Failure indicates loss of aim, as above. If the character was hit by a melee attack of any kind, they may not aim, and any aim they had accumulated is automatically lost.
4. If none of the preceding apply, the character may aim as normal.
In all cases, perform the Bravery check immediately before rolling the dice to resolve the action. The player is not allowed to change actions or targets after determining aim status. Resolve the Bravery check and attack separately.
Aim and Cover
Characters behind cover receive a bonus to performing and maintaining aim. Whenever a character resolves a Bravery check due to tactical aiming add the armor value of the cover to the result. The character must have been behind cover for their entire turn. If a character moved between two instances of cover during their turn, add the lowest armor value to the result.
Fan Firing
Single action revolvers are capable of an attack called fan firing. When fan firing, the trigger is held down, while the off hand slams, or "fans", the hammer repeatedly, cocking the weapon as it fires. It can be wildly inaccurate, and should only be attempted by skilled (or crazy) practitioners.
When using fan fire, first declare the number of shots to be attempted, and also the targets. For each shot add 1 downgrade, starting with the first. Each target after the first increases the difficulty an additional downgrade, successively. Fan-firing is always a snap shot, even if an aim action was performed before the first shot. Fan firing costs 1 AP per shot, plus 1 AP per target switch, and ignores cocking.
When fan-firing, each shot is resolved separately, but from the same dice pool, so the order and target must be clear before rolling. No changes can be made to the series once the dice are rolled.
EXAMPLE
When fan-firing, any successive shots resolve hit locations on separate cards (the shots are not grouped).
Pushing the Limit
Revolvers are not designed for fan-firing. Increase the Rel of any revolver by 1 when fan-firing.
Two Weapons
A Hero using weapons in each hand suffers -1 penalty to the results of each attack. Any action taken with an off hand takes an additional -2. A hero can fire with each hand up to the weapons’ usual rate of fire. Resolve each hand as a separate check.
The previous penalties are in addition to any snap shot penalties for the weapon. Aiming two weapons is only possible if they are pointed together (held closely, so the eyes can see both sights simultaneously), at a single target. This kind of aim takes concentration, so increase the AP cost of any aim action by 2. It is never possible to aim at two different targets, at least one of the shots must be attempted as a snap shot.
Two handed ranged weapons
Generally speaking, you need two hands to operate a rifle, but it can be done with one. Apply a penalty of 2 downgrades to any two-handed ranged weapon being used with one hand. For larger weapons, be sure to consult the weight of the weapon and the Strength of the user.
Hand to Hand Combat
When two combatants are within one pace of one another, either may choose to initiate hand to hand combat. This is called engagement. Hand to hand combat may be armed (Melee) or unarmed (Unarmed). Advanced skills grant special bonuses that characters may use in hand to hand combat, but the associated basic skill level is always used for resolution.
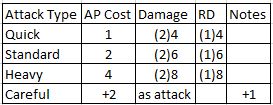
There are four attacks available:
Any attack can be a careful attack, the cost is increased by 2 AP and +1 is added to the result. The cost and bonus for careful can only be applied once per attack. Both armed and unarmed attacks use the same four standard attack types. Attacks do the damage listed plus the Damage Bonus (DB) of the character making the attack.
There are also two defensive maneuvers that may be employed: block and dodge. Block works against a single incoming attack and costs 2 AP. Multiple blocks may be performed in a turn. Dodge works versus all attacks coming from a given direction, usually 120 degrees (two hexsides, or Judge discretion) and costs 3 AP. Dodge is considered an active defense, and may only be employed if no attacks are attempted.
To utilize block, declare your intention before the attacker rolls. Once the result is known, make an unarmed combat test against a TN equal to the result of the incoming attack. If the block result is equal to the attack TN, change the hit location to the off arm (or whatever arm is making the block). If the block result is greater, the attack is successfully blocked and has no effect.
Blocking may also be performed with a weapon. In this case, the procedure is as above except substitute the appropriate weapon skill. Also, do not forget to check for equipment breakage during the block attempt. On an equal result, increase the Rel by 1 instead of changing the hit location.
To perform a dodge, state your intent before the attacker rolls. The dice pool takes a number of downgrades equal to the AD of the defender. Dont forget to pay the AP!
Determining Results
Once a character is ready to perform an attack, the first step is determining the TN. Each character has a defense value, which is 4 + half of the level with the hand to hand skill they are using, rounded up. This is the TN an opponent uses when trying to damage them with an attack.
Characters may make any number of attacks, with the following restrictions:
The number and type of attacks that will be attempted must be clearly declared, as well as the order and priority, before rolling.
The AP value for all attacks and actions must be paid before any attacks are resolved.
A single dice pool is used to determine hits, no matter how many attacks are attempted.
Attacks in excess of the level of the appropriate skill miss automatically (but may have other effects).
EXAMPLE
Breaking Engagement
If one combatant wishes to escape from the engagement they have two choices. They may pay 2 APs to carefully disengage, or they may move away without paying any extra APs. If the latter is chosen, the other combatant may immediately make a hand-to-hand attack for one fewer AP (minimum 0). The 2 APs are in addition to any APs paid for the movement.
Maneuvering During Engagement
Combatants engaged in hand-to-hand combat are not likely to stand still. Movement during melee is very important. Any combatant that does not move at least one hex (or one pace) for two consecutive rounds has their defense reduced by 1.
Maneuvering while remaining adjacent to their opponent does not break engagement and costs 1 AP per hex (or pace). No more than one hex (or pace) may be moved in this manner without breaking engagement.
Hand to Hand Weapon Damage
The gear chart shows a value for DMG and RD for each weapon type. This is the damage for a standard attack. WORK NEEDED (QUICK AND HEAVY)
EXAMPLE
Improvised Weapons
Sometimes a cowpoke needs to attack with whatever is available. It could be the grip of a pistol, a chair, a busted bottle, or anything in between. Improvised weapons add damage to the attack used based on the table below. Small and large weapons deal impact damage, sharp weapons convert the attack to deadly, as well as increase the damage. Improvised weapon damage is added to the damage from the attack type chosen.
Small improvised weapons are one foot or less in length, some examples being a pistol grip, tree branch or an iron skillet. Large improvised weapons are either heavier or larger than small weapons, examples include rifle butts, wooden chairs or large rocks. Sharp improvised weapons have exposed edges or points, like broken glass or nails.
Improvised weapons have a penetration value of 1. Impact penetration attacks add the listed number after the slash to the Force value of the attacker.
Advantage
During hand to hand engagements one combatant often holds an advantage against the other. Advantage can come from many sources, such as position, weapon type, or weapon length. Advantage is tracked via the advantage counter.
The purpose of the advantage counter is to distill many potential types of modifiers into a single bonus. Rather than remembering who has what bonus or penalty, from what source, a single calculation encompasses it all. The advantage can also be used to simulate changes in the fight as it progresses, or new types of maneuvers.
Advantage is determined each round of a hand-to-hand altercation. NEEDS MORE
Determining Advantage
Find the advantage value by adding in the advantage value of any weapon, and a further +1 for each of the following (if applicable):
Height (at least a foot of difference). This can come from raw physical size (an additional +1 per unit of size difference between the characters) or placement (such as being on horseback or up a hill).
Position. This can come from trapping an opponent in a corner, mud or quicksand, or otherwise using the battlefield to your advantage.
Armed. An armed combatant has advantage versus an unarmed one. If one combatant is unarmed, add 1 to the advantage of the armed combatant.
When multiple combatants gang up against a single foe the advantage values of the side with multiple fighters are added together before comparing it with the single combatant. Members of the side with the additional combatants receive a bonus of 1 to their advantage value for each other combatant on their side.
Optional Rule: Weapon Length
The longer weapon has the advantage at the beginning of any combat (as long as the wielder is able to keep their opponent at bay). This advantage switches if the combatant with the shorter weapon is able to successfully attack the torso or head of the wielder of the longer weapon (because they must have closed the distance to do so).
Position in Hand-to-Hand Engagements
The rules as written assume two standing combatants, facing each other and prepared. This is true in many of not most brawls, but what about when it is not?
Even if a fight begins in a standing and facing position, the fight can change positions quickly. A close quarters melee could lead to fighters wrestling on the ground. An opportunistic brawler might push an opponent into a chair and knock them onto their ass. A quick-thinking tough might pin an opponent against a wall. In those cases, one fighter is said to be in a dominant position.
The number of potential dominant positions is nearly countless. Rather than attempting to define each, in TWTW we instead give the Judge and Posse free reign to describe how the environment and conflict lead to dominance, and provide a set of guidelines for how that dominance might affect the ongoing melee. Some situations are presented below.
Full dominance involves an opponent that is pinned or unaware (such as if being attacked from behind or when surprised), the attacker may ignore the hit location result on the Action Card and instead choose where the target is hit. The hit location must make sense (it must be within reach of the given attack), of course. This bonus is in addition to that received from a restricted opponent.
Dominance is when an opponent is restricted but not fully trapped, such as if forced into a corner or prone. A combatant in this situation has their defense reduced by 2. Additionally, their attacks have their damage shifted up one row as well (the damage is reduced). This simulates the difficulty in getting maximum force behind a blow without having full range of motion.
Partial Dominance occurs when the combatant has spent one bump toward dominance and is nearing a dominant position. A combatant that has been forced into a partially dominated position has their defense reduced by 1.
Dominance and advantage are separate.
Asserting Dominance
Each level of dominance costs one bump, cumulative. The dominance level may increase or decrease from round to round. The Posse and Judge should describe how the situation is unfolding in such a way as to illustrate the change in dominance of one fighter. Each bump spent to increase dominance may include up to 2 hexes (or paces) of movement in the direction of the winning combatants choice.
Hank and Dave Perkins are engaged in a melee at the Longhorn saloon. Being a skilled brawler, Hank achieves a bump on his first attack. He informs the Judge that he is maneuvering Dave toward the piano, attempting to get him cornered between it and the wall.
The opponent is not going to just sit idly by and be controlled, most likely. Any bumps spent by an opponent cancel advantage gained on a one for one basis. They may also include up to 2 hexes (or paces) movement as well.
Dave senses what is happening, and on his turn performs a bull rush (heavy attack) at Hank, also scoring a bump. He has successfully canceled the dominance Hank had asserted and maneuvered himself back into the center of the saloon floor.
An attacker may also attempt to utilize the environment to assist in dominance, rather than deal damage. In this case, a successful attack counts as one bump toward dominance.
Seeing his brother in trouble, Clem Perkins shoves Hank into a chair, attempting to cause him to stumble or knock him to the ground. His goal is to create a dominant position for his brother, so rather than attack for damage he indicates he will attack only for dominance. If successful, Dave will achieve partial dominance when Hank stumbles around the chair. If he also achieves a bump, Hank will fall to the ground and Dave will be able to claim dominance.
Breaking Engagements When Dominated
A combatant that is under partial dominance requires a TN 3 + (half level of opponent) Unarmed Combat check to break the engagement. Multiple attempts may be made if necessary. Each attempt costs 1 AP. If successful, the combatant must move at least 1 hex (or scale pace) away from their foe at normal AP cost. If it is not possible to move away from the engagement, the combatant must move (see maneuvering within an engagement, above) prior to making the break-away attempt.
Combatants under dominance must escape from the position before any movement is allowed. An escape costs 2 AP and is TN 5 + (half level of opponent). If successful, the combatant is placed in any adjacent, empty hex (or simply within 1 pace). The combatant may then break the engagement as above (pay 2 APs to carefully disengage or disengage for 0 APs and be subject to attack).
Combatants under full dominance follow the rules for dominance, above, but the attempt is 3 AP and the TN is 7 + (half level of opponent). Otherwise, the situation is identical.
Multiple Attacks
Whether in ranged or hand to hand combat, characters have enough APs to make multiple attacks in a single round if desired. Unless expressly provided otherwise (such as with certain advanced skills) characters only receive a single attack pool no matter how many attacks are made. This means only one roll can be used to resolve all cause actions (hits and misses). All characters are limited to a number of attacks equal to their rank in the appropriate skill, or their trait rank if attacking unskilled.
Changing targets during a series of attacks is 1 AP per switch. If the optional fields of fire rules are being used (see advanced combat), targeting outside of the field of fire is an additional +1 AP.
Resolving Multiple Attacks
All attacks and their targets must be declared before drawing the card.
Cyril Wellington is staring down two of the Perkins brothers. He has spent the night winning all of their wages from the past week, and fair or not, they want that money back. Both are drunk as hell, but still dangerous. He knows that since they each have knives drawn, he has one chance to put them both down or risk having one of more blades sticking out of his chest. He declares that he will fire two shots with his Schofield. Spending 2 APs to cock it twice, 3 AP for a normal shot on Pete, 1 AP for a snap shot on Clem, and 1 AP to switch targets to the Clem. He has 2d10 in Firearms: Pistol, so he has enough results in his pool for both attacks. He declares that he will spend 7 AP.
To resolve the attacks, flip the card and use the highest result in the pool for the first attack, the second highest for the second, etc. Continue until all attacks have been fully resolved.
EXAMPLE
Action Sabotage
A situation may arise where a character wishes to seem to do something, but is actually trying to fail at it. In many cases, it can just be assumed that the action fails as intended. However, in some dangerous situations it is better to leave the failure up to chance.
In general, when trying to fail intentionally, the attempt fails unless one of two things occurs: a calamity is generated, or the unintended targets icon shows a possible target that exists. One example is firing a weapon toward a target, with no intention of actually hitting it. In such a case, a calamity indicates the target is hit, while the unintended target could be a bystander or important piece of scenery.
Applying Damage and Wound Effects
In TWTW there are two types of damage: impact and deadly. Impact damage is that which is dealt by bare hands and most blunt weapons. Deadly damage is dealt by firearms, blades and other piercing or slashing weapons and hazards.
Impact Damage
Impact damage is dealt primarily to Concussion. Double the targets Size. If the effect is less than this number, apply the effect as Conc. If it is greater, subtract this number from the effect and deal one wound. Apply any remaining effect to the Size of the target. If it is less, apply it as Conc. If it is greater than or equal, apply a wound and subtract the Size from the effect. Continue until all effect is applied.
Angus Laroq has taken down Hank with a successful hit, a quick attack. The damage for a quick attack is 5 + DB, which is 3. Hank has a size of 6, so he is dealt 8 Conc. He has 6 Conc remaining, this was a significant blow!
Had Angus used a heavy attack, the result would have been EXAMPLE.
Any damage can kill, even impact damage. If the final wound dealt to a target in the torso or head is impact, check the toggle result on the card. On a YES, the target is killed. On a NO, the target falls unconscious.
Deadly Damage
Damage from most weapons is deadly. With deadly weapons, take the effect from the attack and compare it to the Size of the target. For each multiple of the size, apply one wound. Subtract all effect used to generate wounds and apply the remaining effect as Conc.
When Miranda Valentine uses her Peacemaker, it deals deadly damage. A normal hit deals 10: 1 wound and 4 Conc. If it were increased to 14 via bumps, two wounds and 2 Conc would be dealt.
Applying Results
A successful hit result indicates that the intended attack has struck the target. Determining the effect this has on them is what follows. Action cards provide all of the necessary detail, and work the same in both hand to hand and ranged combat.
Hit Location
Each successful attack also has an associated hit location. Each hit location is unique for the addition of wounds, except in the case of chest, belly and vitals, which are all considered to be a single location: torso. Wounds to these three locations are added together. Additionally, each arm and leg is a separate location.
Wounds dealt to the vitals add one damage bump. Those dealt to the head add two damage bumps.
Burst Results
The burst results section of the card is used only for speed loading and the Gatling gun.
Hit Location
Each action card has a hit location section located directly below the burst icons. This is a stack of potential locations, with the third from the top, the one with no adjacent triangles, the standard hit location. Hit location may be changed within the stack via bumps (see below).
The hit location stack is arranged in order, top to bottom. This means, generally, locations at the bottom of the stack are below those at the top. Results closer to the burst icons are referred to as "up" when compared to the standard location, while those closer to the penetration results are considered "down".
Vitals are any of the target's vital parts, such as heart, lungs, throat, etc. Vitals, chest and belly are torso for purposes of wounds and wound modifiers. They are treated separately by the hit location chart for cover determination and narrative flavor, as well as the bonus for vitals.
Hit Location and Cover
TWTW does not assess to hit penalties to targets within cover. As long as any part of the target can be seen, or reasonably discerned (targets that are not visible behind cover can be attacked with a penalty of -3), an attack may be attempted. After determining hit location, the effect of cover can be determined. If the intervening cover is between the target and the attacker, the cover will be hit instead. The Judge should clarify which locations are covered, if applicable, before the card is drawn.
If the cover is hit, proceed to the penetration rules to determine if the attack penetrates, and, if so, whether or not the target is affected.
Hit Location and Damage
Some hit locations have special damage rules. Any hit to the head provides 2 damage bumps. Any hit to vitals provides 1.
Anytime a location takes a 5th wound it is disabled. For a limb, such as arm or leg, the location is either severed or otherwise rendered useless. In most cases this is permanent. If the location is the torso (chest plus belly and vitals) or head, disabling results in critical wounds (see death, below).
Cover Penetration
When a target is behind cover, the cover has an opportunity to deflect the attack before damage is applied. The table below lists some common obstacles and their Armor Values (AV). To determine if an attack penetrates armor, add the penetration result from the action card to the Pen of the weapon, then compare the result (called PV) to the AV of the cover.
| Armor Value | Obstacle | |
| 1 | glass | |
| 2 | thin wood | |
| 3 | hardwood | |
| 4 | adobe or thin iron plating | |
| 5 | thick iron |
There are three possible results: P, A, and D. The P (penetrate) result occurs when the PV is 2 or more greater than the AV. In this case, deal the DMG amount listed for the attack to the target. An A (ablate) result is indicated when the PV is equal to or one greater than the AV. In this case, deal the RD to the target and reduce the AV of the cover by 1. Finally, if the PV is less than the AV, the attack deflects (D). There is no effect from an attack that deflects.
Wound Effects
Wounds are a terrible burden. Shock distorts senses, pain distracts concentration, and damage to arms and legs make holding things and movement of any type nearly unbearable. All of this is manifested with AP penalties which reduce how much a character can do. Consult the table below for details regarding the magnitude of these penalties. Wound effects are subtracted from the total APs.
| Wounds | Description | AP Penalty | Stun |
| 1 | Flesh Wound | 1 | 3 |
| 2 | Light | 2 | 5 |
| 3 | Heavy | 3 | 7 |
| 4 | Serious | 4 | 9 |
| 5 | Critical | 5 | 11 |
The penalty depends on the highest-level wound your hero has suffered. If they have a light and a serious wound, for instance, subtract the penalty for serious wounds (3) from the AP pool, irrespective of wound location.
Shock might be more than a lingering distraction, it might conspire to cause a character to miss an action or two. Whenever a character is dealt damage they must check Fortitude, called a Stun check. The TN is listed in the Stun column of the wound penalty table. Success, of course, means the character is not stunned (but the damage is still applied).
Failure causes a character to be stunned until a successful recovery check is made. Each round, stunned characters use their action (Recover, all APs) to attempt a recovery check to shake off the stun. Any character that critically fails a recovery check immediately falls unconscious for 1d6 hours or until someone makes a Standard (5) medicine roll to revive.
Action Cards in Combat
Combat actions can potentially use the entire action card. Each section will be covered individually, in sequence, with a continuing example. The West That Wasnt is designed to be played with an action deck and a character sheet, no other accessories are needed (ok, maybe a pencil and a drink of choice). To that end, the character sheet is crafted to make the most complex actions, simple.
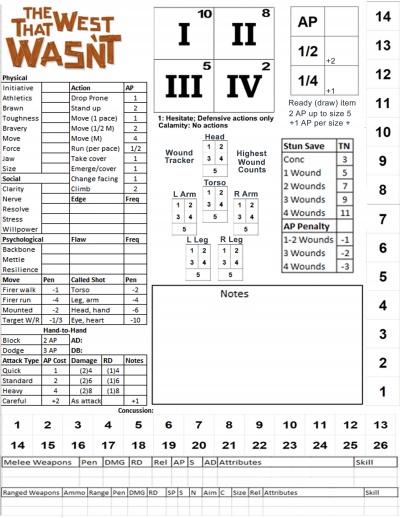
On the back of the character sheet is a combat reference aid. It contains handy information about game mechanics. When it is time to enter combat, flip your sheet and consult the information contained there.
Resolution Flow
Cards are designed to begin in the upper left and flow down and to the right. The order of the sections is outlined below, but remember to only use what you need. The sequence of operations is similar to other games:1. Determine hit or miss. If miss, proceed to step 6.
2. Determine number of hits.
3. Determine hit location(s).
4. Check for armor penetration/ablation. If no penetration, proceed to step 6.
5. Determine damage.
6. Check for ancillary effects.
All results are found on a single card. See diagram at right for order of operations map. At the conclusion of the resolution, discard the card.
Step 1 is for determining success or failure, see the simple skill check section for more on using this feature. Step 2 is for burst fire. If only a single shot is attempted, skip this section. Using this section is described below. Step 3 is hit location. Step 4 is armor penetration/ablation, described below. Step 5 is damage, see complex task resolution for instructions on how to use this feature. Step 6, ancillary results, are covered below.
Determining Hits
In combat, hits are determined exactly like simple skill checks. In ranged combat, the TN is determined by the range and weapon type, and modified based on environmental, equipment and other factors as determined by the Judge. In melee combat, the TN is determined by weapon type and skill of the opponent, modified by other factors as determined by the Judge. In all cases the Judge will tell you the TN before a card is drawn.
Combat Example, Miranda vs Miners
While Cyril finagles the bridge, Miranda drops to a knee and points her Sharps at the oncoming horde. She knows many hombres are on their tail, the clicks of their hooves echoing in the morning stillness. After a few very long seconds, the lead vaquero barrels around the corner at speed. Cool as the desert night, she unloads.
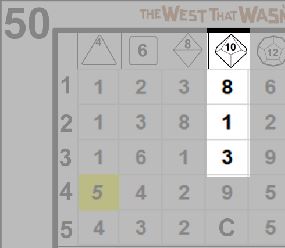
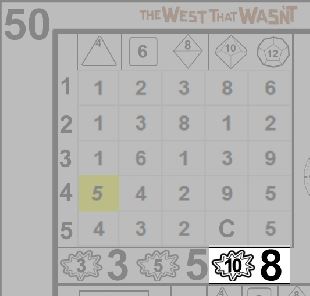
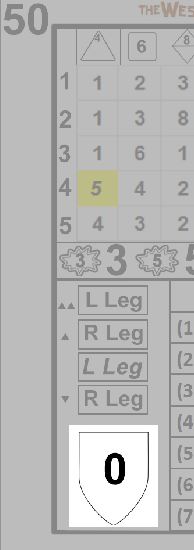
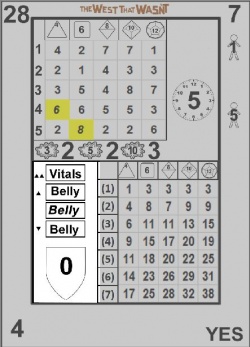
The range is close for a Sharps rifle, which makes the TN 5. Because the mounted cowboy is moving at 18 paces, and Miranda is stationary, the movement penalty is -3. The rifle is loaded and cocked, Miranda will aim and fire. The following card (50) is drawn:
She has 3d10 in Shooting: Rifle. The results 8, 1, 3 indicate a hit. This cowboy is going to wish he never left the breakfast table.
Missed Throws
To determine the location of an object that has been thrown, but does not hit the intended target, use the clock face in the ancillary effects section. Position the dial so the intended target is in the middle of the face and the 6 is pointed directly at the origin of the throw. The errant throw goes a number of paces equal to the step result (lower left hand number) in the direction indicated by the number in the clock face.
Hank is attempting to throw a lit bundle of dynamite into a passing wagon. The TN for the throw is 6, but his skill result is only 4. Checking the clock face, he finds a 9, with a 3 in the step. The wagon is 2 paces long, so his bundle lands 2 paces behind the wagon.
Burst Fire
Some weapons are capable of firing more than one shot in a single action (such as a Gatling gun). These weapons use the burst section of the action card. If a hit is scored, check the appropriate burst result to see how many shots hit. Weapons that are capable of firing in more than one mode are assumed to fire the minimum number of shots unless specified otherwise. The burst fire chart is located beneath the cause grid in the upper results.
The number to the left, within the burst icon, is the burst value, which indicates the number of projectiles fired. The number to the right is the number of actual hits (or successes) scored. The difference between the burst value and the number of hits is called stray shots (used with optional unintended targets rules). Each hit after the first in a given location increases the row on the effect grid by 1 (so (3)6 becomes (4)6). Alternatively, if bumps are used, each additional hit after the first adds one conditional "burst fire" bump.
See the action card appendix for more on burst fire results.
Hitting Multiple Targets
Burst weapons can hit multiple targets with each action. When using a burst weapon, such as a Gatling cannon, check all of the cells in the result pool. Each cell that would have been a successful hit after the first can optionally hit another target instead of the first. The number of total hits between all targets is limited by the appropriate burst result value, after any bumps are applied.
Combat Example, Angus cranks his Gatling, continued
After multiple complaints by local Mexican authorities regarding rustling activity from across the border, a company of Mexican army regulars approaches the Laroq hacienda. Angus Laroq knows the stolen cattle will surely be found since he has not yet had time to rebrand them. His only choice against so large a force is to authorize using his Gatling cannon. When they are within range, his vaquero fires.
His skill with the weapon is 2d8.
He scores one success. Up to one target can be hit.
Consulting the burst results, he finds 8 rounds hit the target. This causes 7(!) damage bumps.
There are 2 stray shots, so the unintended targets section is referenced. The result is 3, so no unintended targets are hit.
Hit Location
To the left of the effect grid is a set of four rectangles. Each of these contain a hit location.
The second rectangle from the bottom is italicized and bold. This is the standard hit location. The other hit locations are used with the optional bump rules (see below) as well as with positional adjustments such as advantages of high ground. Consult the conflict chapter for more on hit locations.
Next to all the rectangles except the standard hit location is either 1 or 2 triangle arrows. These arrows represent both direction and cost. Each triangle is one bump to change to that location, and the direction is either up or down. The hit location bank is a stack of rectangles, and the results are arranged to generally move up the body (toward the head) as you move up in the stack. When results are within the same location, thematically it can be assumed that higher in the stack is a higher spot within the location. Sometimes results will go from side to side, such as right to left arm or leg. In this case, even though they are arranged on top of one another, the location change is horizontal.
Your posse can interpret the results horizontally and vertically however they wish. These thematic options are suggestions only, intended to help visualize the action.
Combat Example, Miranda vs Miners, continued
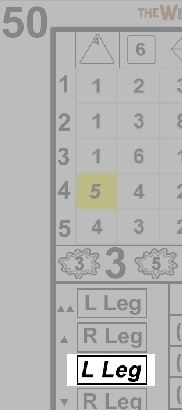
Consulting the hit location section of the card, Miranda determines that her round hits the left leg.
Armor Penetration/Ablation
Successfully placing projectiles on a target is one thing, penetrating the protection of said target is another. Each weapon has a penetration value. Cover has protection value. Some creatures may have natural armor, which works like cover, due to thick hide or other natural protection.
Each action card has a shield icon to the left of the effect grid. Inside the shield is a number from -2 to +2. This number is applied to the penetration value of the attack before comparing it to the protection value of the armor or cover. The resulting number is known as the Effective Penetration (EP).
If the EP is 2 or more greater than the protection value of the armor, the attack penetrates. If the EP is equal to or one greater, the attack ablates. If the EP is less than the protection value, the attack deflects.
Attacks that penetrate do full damage (DMG). Attacks that ablate do reduced damage (RD). In both cases, the protection value is decremented. Attacks that deflect do no damage and the protection value is unaffected.
Characters have no natural armor versus weapons that do deadly damage. These weapons automatically penetrate for full damage, unless the character has cover or some other means of protection.
Combat Example, Miranda vs Miners, continued
Now for the moment of truth. Can Miranda dethrone or otherwise neutralize the lead miner? The Sharps is Penetration 4. The miner has no cover or armor of any kind.
The Sharps hits the left leg, and since it is a weapon which does deadly damage, it automatically penetrates dealing full DMG: (5)8.
Dealing Damage
Damage is applied exactly as described in complex tasks. The only difference between collecting victories and assigning wounds is that any leftover effect magnitude is applied as concussion. See the Conflict chapter for more on dealing damage.
Combat Example, Miranda vs Miners, continued
The Sharps deals (5)8 to the left leg.
Ouch, the result is 14. The shot deals 2 wound and 2 concussion. The Miner takes a minor wound to the leg, and must make a Stun save. See the Conflict chapter (linked above) for rules on how to do this.
Ancillary Effects
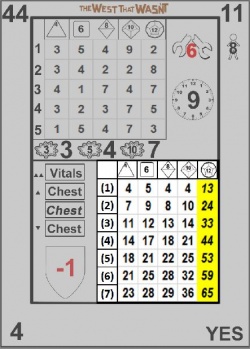
Once all hits are applied, the next step is determining if any other effects occur. There are two possible ancillary effects: equipment failure and unintended targets. Equipment failure is represented by a wrench icon located just above the scatter clock face.
If a broken wrench with a number superimposed on it is present, that number is compared to the reliability of the equipment to determine if a breakage occurs (equipment fails when the result over the wrench is below the equipment reliability). If the section is blank, it can be ignored. See the gear chapter for more information on equipment reliability.
The second possible ancillary effect is unintended targets. Before any ranged shot is attempted, the Judge may inform the player of potential unintended targets (in the case of other PCs or important NPCs or terrain features, the Judge should inform the player before the shot is attempted). Generally, unintended targets are within one meter of the firing path of the weapon. Unintended targets may be living or otherwise, such as windows, breakable objects, etc. See the Conflict chapter for more on determining potential unintended targets.
Compare the number of stray shots to the numbers superimposed over the figure icons. If the number of stray shots is equal to or greater than any of these numbers, an unintended target is hit. Note that multiple unintended targets can be hit in a single action if multiple targets are indicated and there are sufficient stray shots.
Shotguns have the scatter attribute, so not only do they always have a stray shot, for each range band beyond the first one more potential stray shot is added to the stray shot pool. Therefore, if a shotgun misses a shot at long range, up to 4 unintended targets could be hit. Check the unintended targets section, and each number 4 or less is a target hit.
In most circumstances the closest or most obvious unintended target is hit first. Unintended targets can be used to increase immersion and drama during scenes. Missed shots have to go somewhere. The Judge has final determination of which unintended targets are hit, however it is suggested that players be made aware of possible unintended targets before attempting a shot.
See the Conflict chapter for more on unintended targets. The action card appendix discusses how unintended targets are determined, as well as an alternate method for using the unintended target track.
Combat Example, Miranda vs Miners, conclusion
Now that the damage has been dealt, the remaining possible effects must be determined, if any. First, check for equipment failure.
Since nothing is present, there is no possibility of equipment failure.
Finally, unintended targets. The Sharps is a single shot weapon, and because it hit there are no stray shots. Even though there are many potential unintended targets, no one else is hit.
Since there are no stray shots, no unintended targets are struck.
Action Card Hacking
The action cards are designed as "one card, one resolution", in that no matter what you need, it is all there in a single card draw. The only time multiple cards are used is optional effects, like increased effect, and multiple attacks, which are by definition multiple resolutions. The cards are also designed to be extensible, and can be used in multiple ways.
Once basic card mechanics are mastered, it may be desired to uncouple the causes and effects. This can easily be done with very little increase in resolution time. As long as the usage is consistent, or clearly defined before drawing, results from multiple cards can be used in the same resolution. The following examples are only suggestions, play the game you want!
Cause/Effect Uncoupling
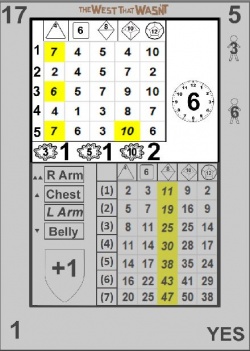
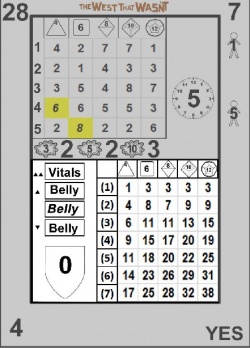
In this style of card use, two cards are drawn. The first card uses the cause section, while the second uses the effect. This means if cards 17 and 28 were drawn, the following sections would be available for use:
This small change takes the deck from 54 cards to 54x53: 2862, which would be enough unique cards for 286 sessions (one per week for 5+ years) if you had 10 checks per session. In other words, plenty of variance.
Nothing changes about the way each card is read. In effect you have created a new card with the cause section of 17 and effect of 28. If the outer edge is needed, use the first drawn card (in this case, 17).
Hit-Location-Damage Draw
In this variant, three cards are drawn. The first card is used for the cause result, "to hit"; the second is used for hit location and armor penetration; and the third for effect "damage". As above, the variability in the deck is increased dramatically, while the increase in time to resolve the action is negligible.
Note that the equipment failure is in the cause section, even though it is resolved last. The broken wrench in card 44 is ignored; the section that is used is on card 17, which is blank.
